Use care in handling the AMP connectors. They are very fragile and easily damaged. Follow the steps outlined in this procedure to avoid damage.
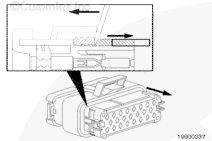
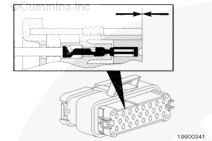
Check to be sure the connector wedge lock is in the open position.
NOTE: The connector assembly is shipped in one piece, with the wedge lock in the open position. It is possible that during adverse shipping conditions that some wedge locks can get bumped into the closed position.
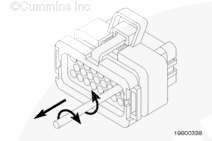
Remove the damaged contacts, rotate the contact wire back and forth over a half turn (¼ turn in each direction). Gently pull the wire until the contact is removed.
Refer to the appropriate wiring repair kit in the service tools table in the front of Section 19 for the correct repair wire.
NOTE: Replace one contact wire at a time. If more than one wire needs replaced, attach a lettered tag to each wire removed.
Refer to the wiring diagram in Section E for pin locations.
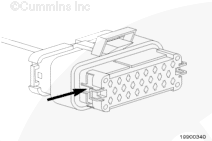
After all of the required contacts have been replaced, the wedge lock must be closed to its LOCKED position. Release the locking latches by squeezing them inward.
Use care in handling the AMP connectors. They are very fragile and easily damaged. Follow the steps outlined in this procedure to avoid damage.
NOTE: The connector assembly is shipped in one piece, with the wedge lock in the open position. It is possible that during adverse shipping conditions that some wedge locks can get bumped into the closed position.
Check to be sure the connector wedge lock is in the open position.
Replace one contact wire at a time. Attach a lettered tag to each wire removed.
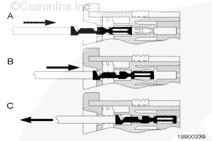
Before installing the new connector, perform a test fit to make sure the connector is keyed correctly.
Remove all of the contacts. Rotate the contact wires back and forth over a half turn (¼ turn in each direction). Gently pull the wire until the contact is removed.
Refer to the appropriate wiring repair kit in the service tools table in the front of Section 19 for the correct repair connector.
Refer to the wiring diagram in Section E for pin locations.
After all of the required contacts have been replaced, the wedge lock must be closed to its LOCKED position. Release the locking latches by squeezing them inward.
Hello, I'm Jack, a diesel engine fan and a blogger. I write about how to fix and improve diesel engines, from cars to trucks to generators. I also review the newest models and innovations in the diesel market. If you are interested in learning more about diesel engines, check out my blog and leave your feedback.
View all posts by Jack
 CAUTION


;)
;)
;)
;)
;)
;)
;)
;)
;)
;)
;)
;)