Due to the number of drive belt arrangements, this procedure does not cover all available cooling fan drive belt routing.
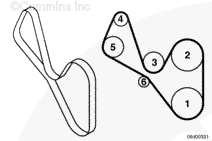
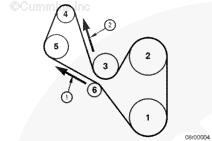
To make sure the cooling fan drive belt is routed correctly upon installation, make a diagram of the cooling fan belt routing prior to removing the belt, as shown in the illustration.
The cooling fan belt routing typically consists of the following components, but may not include all of them:
Crankshaft pulley/vibration damper
Fan pulley
Water pump pulley
Refrigerant compressor pulley
Alternator pulley
Belt tensioner pulley.
NOTE: Some engine-driven belts are installed/supplied by the vehicle original equipment manufacturer (OEM). See the OEM service manual for removal and installation instructions.
NOTE: This content in this section is generic and may not apply to all available cooling fan drive belt systems.
The following section contains diagnostic information and procedures to aid in identifying drive belt and accessory drive issues. These issues may include:
Belt noise (squeal and chirp)
Belt tracking (jumping)
Belt fraying
Snub breaks and punctures.
Common causes of drive belt noise, fraying, and breaks are:
Drive pulley misalignment
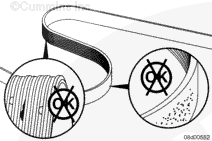
Embedded debris in drive pulley grooves
Incorrect belt material and/or belt length
Damaged or incorrect automatic belt tensioner
Improper drive belt routing
Improper fan size and/or fan clutch.
The original drive belt and tensioner should be used, if possible, while troubleshooting drive belt issues. Replacement of a belt and/or tensioner prior to troubleshooting may mask the root cause of the issue due to the break-in time required for a belt and tensioner.
NOTE: A newly installed belt and/or tensioner will not come to rest properly until the engine is operated. Always operate the engine for a brief period of time prior to verifying the tensioner resting location.
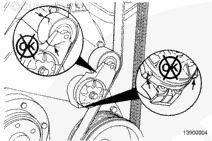
Inspect the automatic belt tensioner. Refer to Procedure 008-080 in Section 8. If the belt tensioner does not meet the reuse criteria, the belt tensioner must be replaced.
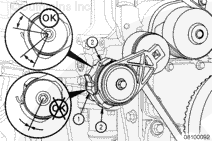
With the belt installed, check the automatic belt tensioner resting position. If the belt tensioner arm stop is contacting either of the spring case stops:
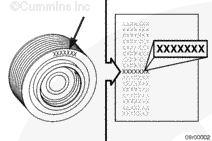
Verify the correct belt part number is installed
If the correct belt is installed, replace the belt.
Verify all accessory drive components and pulleys are correct. Components yielding incorrect part numbers, or installed without the appropriate spacers and/or brackets may contribute to gross drive belt misalignment.
Verify proper drive belt routing, if available. Refer to the OEM service manual.
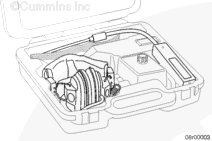
Isolating the source of drive belt noise may be done by use of an electronic stethoscope, or an equivalent device designed to block audible noise other than that desired, by use of a microphone.
Drive belt noise may be difficult to isolate and troubleshoot. The origin of drive belt noise may not be located at the pulley out of alignment, rather ‘upstream’ from the noise origin.
Troubleshooting should always be completed in a direction opposite belt travel (i.e. counter clockwise) beginning at the pulley where the noise originates.
Arrow number (1) indicates belt travel direction, whereas arrow number (2) represents the direction in which troubleshooting should be conducted.
Flat pulleys should be inspected for uneven wear patterns
Grooved pulleys should be inspected for embedded debris, belt dust buildup, and pulley alignment.
NOTE: The belt alignment laser tool can identify misalignment of pulleys down to ½ of a belt rib. The capability of the alignment fixture is contingent upon proper calibration. Make sure all set-up and calibration procedures are followed before verifying pulley alignment.
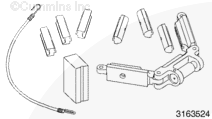
Use a Belt Alignment Laser Tool, Part Number 3163524, or equivalent, to verify all pulleys are aligned correctly.
Pulley alignment should always be checked from the fan pulley, and crankshaft pulley to other front end mounted grooved pulleys. Contact a Cummins® Authorized Repair Location for drive belt alignment.
Batteries can emit explosive gases. To reduce the possibility of personal injury, always ventilate the compartment before servicing the batteries. To reduce the possibility of arcing, remove the negative (-) battery cable first and attach the negative (-) battery cable last.
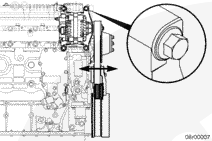
The belt tensioner is spring-loaded and must be pivoted away from the drive belt. Pivoting in the wrong direction can result in damage to the belt tensioner.
CAUTION
Applying excessive force in the opposite direction of windup or after the tensioner has been wound up to the positive stop can cause the tensioner arm to crack or break
CAUTION
Using a socket extension is not recommended because it can cause axial twisting damage to the belt tensioner.
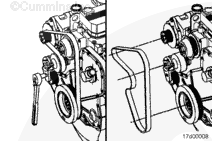
Lift the tensioner to remove the drive belt.
NOTE: If a socket extension is necessary, support the head of the ratchet with one hand to prevent the belt tensioner arm from unintended loading.
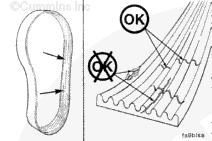
Inspect the idler and drive pulleys for wear or cracks..
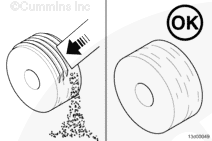
Plastic pulleys often have a buildup of road dirt and belt material that is not to be confused with wear.
The dirt can be removed with a suitable tool to check for wear.
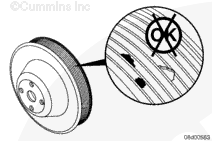
Clean, check, and reuse all pulleys in the front end accessory drive if not damaged, rather than replacing. Pulleys damaged from embedded debris MUST be replaced.
Remove any debris from the grooves of the pulley. If the pulley has been deformed as a result of foreign material embedment, the pulley MUST be replaced.
Route the drive belt on the engine. Use the belt diagram created in the Remove section. Do not install the belt over the water pump pulley at this time.
The belt tensioner is spring-loaded and must be pivoted away from the drive belt. Pivoting in the wrong direction can result in damage to the belt tensioner.
CAUTION
Applying excessive force in the opposite direction of windup or after the tensioner has been wound up to the positive stop can cause the tensioner arm to crack or break.
CAUTION
Using a socket extension is not recommended because it can cause axial twisting damage to the belt tensioner.
Pivot the tensioner in the direction of the spring tang and install the drive belt, slipping the belt over the water pump pulley last.
Slowly, release the belt tensioner to apply tension to the drive belt.
NOTE: If a socket extension is necessary, support the head of the ratchet with one hand to prevent the belt tensioner arm from unintended loading.
Check the alignment of the belt with the tensioner and the rest of the front-end accessory drive.
Batteries can emit explosive gases. To reduce the possibility of personal injury, always ventilate the compartment before servicing the batteries. To reduce the possibility of arcing, remove the negative (-) battery cable first and attach the negative (-) battery cable last.
Hello, I'm Jack, a diesel engine fan and a blogger. I write about how to fix and improve diesel engines, from cars to trucks to generators. I also review the newest models and innovations in the diesel market. If you are interested in learning more about diesel engines, check out my blog and leave your feedback.
View all posts by Jack


 WARNING
 CAUTION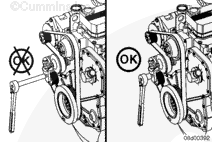


;)
;)
;)
;)
;)
;)
;)
;)
;)
;)
;)
;)
;)
;)
;)
;)
;)
;)
;)
;)
;)
;)
;)
;)
;)
;)
;)
;)
;)
;)
;)
;)
;)
;)