ISM, ISMe, and QSM11 – 008-053   Heat Exchanger

View Related Topic


Preparatory Steps

TOC

 WARNING 

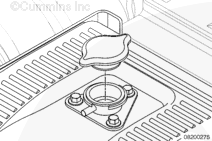
Do not remove the pressure cap from a hot engine. Wait until the coolant temperature is below 50°C [120°F] before removing the pressure cap. Heated coolant spray or steam can cause personal injury.
 WARNING 

Coolant is toxic. Keep away from children and pets. If not reused, dispose of in accordance with local environmental regulations.

Remove the coolant pressure cap.

SMALL | MEDIUM | LARGE


Remove the drain plug from the bottom of the heat exchanger.

After coolant is drained, apply thread sealant and install the drain plug.

Coolant Drain Plug 15 n.m [133 in-lb]

SMALL | MEDIUM | LARGE


Drain the sea water from the heat exchanger.

  • Secure the sea water supply valve
  • Locate a point in the system that is lower than the heat exchanger to drain the sea water.

SMALL | MEDIUM | LARGE
   

Remove

TOC

Disconnect the coolant vent line from the expansion tank.

SMALL | MEDIUM | LARGE


Disconnect the wiring harness from the coolant level sensor.

SMALL | MEDIUM | LARGE


Remove the two capscrews from the lower sea water pipe flange at the aftercooler assembly.

SMALL | MEDIUM | LARGE


Remove the two capscrew and tube clamps.

Remove the sea water inlet pipe from the heat exchanger assembly.

SMALL | MEDIUM | LARGE


Remove the two capscrews from the marine gear oil cooler and disconnect it from the outlet side of the heat exchanger assembly.

SMALL | MEDIUM | LARGE


Remove the two capscrews from the flange at the coolant water pump inlet.

SMALL | MEDIUM | LARGE


The coolant tube is a floating connection.

Remove the coolant tube and o-ring from the heat exchanger by twisting and pulling the coolant tube straight out.

SMALL | MEDIUM | LARGE


Remove the two capscrews and coolant return tube from the upper portion of the expansion tank.

SMALL | MEDIUM | LARGE


Loosen the two hose clamps at the thermostat housing and remove the coolant return tube.

SMALL | MEDIUM | LARGE


Remove the two mounting capscrews from the front of the heat exchanger.

SMALL | MEDIUM | LARGE


Remove the two mounting capscrews from the lower heat exchanger rear mounting bracket.

SMALL | MEDIUM | LARGE


Remove the two mounting capscrews from the upper heat exchanger mounting bracket.

SMALL | MEDIUM | LARGE


 WARNING 

This component or assembly weighs greater than 23 kg [50 lb]. To prevent serious personal injury, be sure to have assistance or use appropriate lifting equipment to lift this component or assembly.

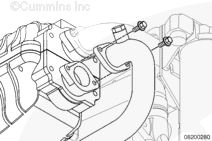
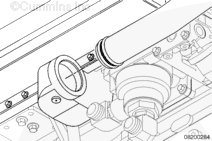
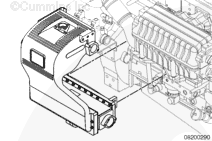
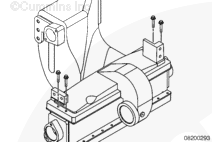
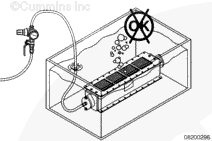
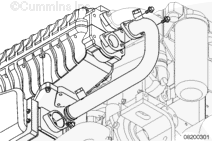
Remove the heat exchanger and expansion tank assembly from the engine.

SMALL | MEDIUM | LARGE
   

Disassemble

TOC

Remove the four capscrews from the outer housing. These capscrews are threaded into the heat exchanger core.

SMALL | MEDIUM | LARGE


 WARNING 

This component or assembly weighs greater than 23 kg [50 lb]. To prevent serious personal injury, be sure to have assistance or use appropriate lifting equipment to lift this component or assembly.

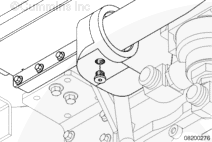
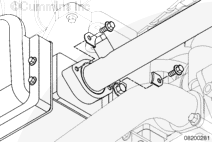
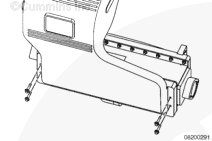
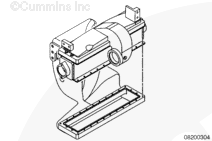
Rotate the heat exchanger assembly over so that the outer housing is laying on its back.

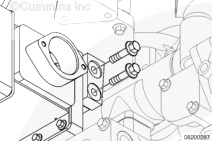
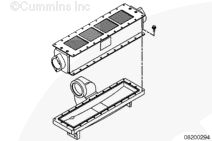
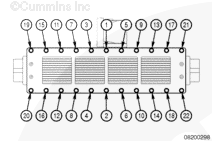
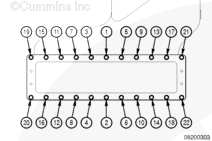
Remove the 22 capscrews from the outer housing that connects to the heat exchanger core.

SMALL | MEDIUM | LARGE


Remove the four capscrews from the inner housing. These capscrews are threaded into the heat exchanger core.

SMALL | MEDIUM | LARGE


Remove the heat exchanger core and inner housing from the outer housing.

SMALL | MEDIUM | LARGE


Rotate the heat exchanger core over so it rests on the inner housing.

Remove the 22 capscrews connecting the heat exchanger core to the inner housing.

Separate the heat exchanger core from the inner housing.

SMALL | MEDIUM | LARGE
   

Leak Test

TOC

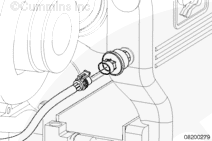
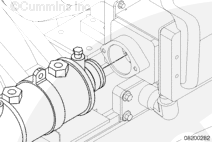
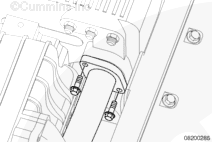
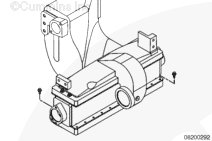
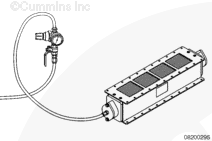
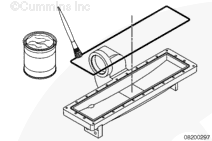
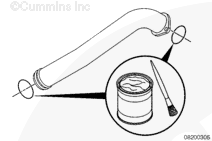
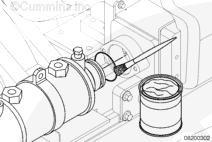
Plug one end of the heat exchanger core and attach a flange (locally manufactured) with a air hose fitting and air hose to the other end of the heat exchanger.

SMALL | MEDIUM | LARGE


 WARNING 

Wear appropriate eye and face protection when using compressed air. Flying debris and dirt can cause personal injury.

Place the heat exchanger core into a tank of water.

Apply 103.4 kPa [15 psi] of air pressure to the heat exchanger core for 1 minute.

Watch for air bubbles. If any bubbles are present, the heat exchanger core
must be replaced.

Shut off the air supply and remove the heat exchanger core from the water tank.

Remove the pressure test equipment.

Use compressed air to dry the heat exchanger core.

SMALL | MEDIUM | LARGE
   

Assemble

TOC

Place the inner housing on a flat surface with the o-ring groove facing up.

Use Lubriplate™ paste on the o-ring to be certain of a proper seal without damage.

Install the o-ring into the groove in the inner housing.

NOTE: The o-ring has to be stretched slightly to fit properly in the groove in the inner housing.

SMALL | MEDIUM | LARGE


Place the heat exchanger core onto the inner housing.

Verify that the o-ring has remained in place in the groove.

Once the heat exchanger core is in place, the o-ring will remain in the proper position.

Install the 22 capscrews attaching the heat exchanger core to the inner housing.

SMALL | MEDIUM | LARGE


Tighten the capscrews in the sequence shown.

Torque Value:  8  n.m  [71 in-lb]

SMALL | MEDIUM | LARGE


Place the outer housing on a flat surface with the o-ring groove facing up.

Use Lubriplate™ paste on the o-ring to be certain of a proper seal without damage.

Install the o-ring into the groove in the outer housing.

SMALL | MEDIUM | LARGE


Place the heat exchanger core with the inner housing attached onto the outer housing.

Verify the o-ring has remained in place in the groove.

Once the heat exchanger core is in place, the o-ring will remain in the proper position.

SMALL | MEDIUM | LARGE


Install the 22 capscrews attaching the outer housing to the heat exchanger core.

SMALL | MEDIUM | LARGE


Tighten the capscrews in the sequence shown.

Torque Value:  8  n.m  [71 in-lb]

SMALL | MEDIUM | LARGE


Install the 4 capscrews that go through the inner housing into the ends of the heat exchanger core.

SMALL | MEDIUM | LARGE


Tighten the 4 capscrews in the sequence shown.

Torque Value:  8  n.m  [71 in-lb]

SMALL | MEDIUM | LARGE


 WARNING 

This component or assembly weighs greater than 23 kg [50 lb]. To prevent serious personal injury, be sure to have assistance or use appropriate lifting equipment to lift this component or assembly.

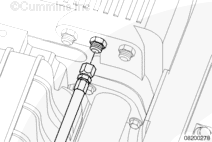
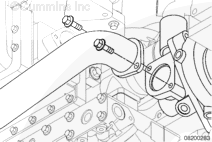
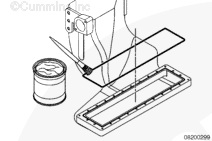
Rotate the heat exchanger assembly over so that the outer housing is facing up.

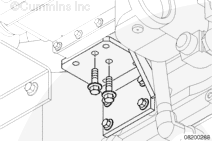
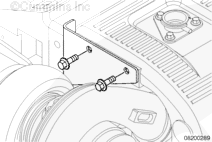
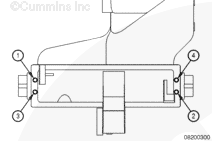
Install the 4 capscrews that go through the outer housing into the ends of the heat exchanger core.

SMALL | MEDIUM | LARGE


Tighten the 4 capscrews in the sequence shown.

Torque Value:  8  n.m  [71 in-lb]

SMALL | MEDIUM | LARGE
   

Install

TOC

 WARNING 

This component or assembly weighs greater than 23 kg [50 lb]. To prevent serious personal injury, be sure to have assistance or use appropriate lifting equipment to lift this component or assembly.

Install the heat exchanger and expansion tank assembly onto the engine.

SMALL | MEDIUM | LARGE


Install but do
not tighten the two mounting capscrews to the front of the heat exchanger.

SMALL | MEDIUM | LARGE


Install the two mounting capscrews to the lower heat exchanger rear mounting bracket.

SMALL | MEDIUM | LARGE


Install the two mounting capscrews to the upper heat exchanger mounting bracket.

Hand tighten all the capscrews once the heat exchanger assembly is in place.

Tighten the capscrews in the following sequence:

  1. Front mounting capscrews
  2. Lower mounting capscrews
  3. Top mounting capscrews
Torque Value:  44  n.m  [32 ft-lb]

If the upper and lower mounting brackets where loosened to gain the heat exchanger alignment, tighten them to the following torque specifications.

Upper Bracket Capscrews 30 n.m [22 ft-lb]

Lower Bracket Capscrews 44 n.m [32 ft-lb]

SMALL | MEDIUM | LARGE


Use Lubriplate™ paste on the o-rings and install them onto the end of the coolant tube and into the groove on the flange of the coolant suction tube.

SMALL | MEDIUM | LARGE


Insert the coolant tube with the o-ring into the heat exchanger outlet connection.

SMALL | MEDIUM | LARGE


Verify the o-ring is still in place.

Install the flanged end of the tube and two capscrews to the coolant water pump inlet.

Torque Value:  44  n.m  [32 ft-lb]

SMALL | MEDIUM | LARGE


Insert the coolant return tube into the hose on the thermostat housing.

SMALL | MEDIUM | LARGE


Use Lubriplate™ paste on the o-ring and install it in the groove on the coolant return tube flange.

Install the coolant return tube to the expansion tank.

Tighten the hose clamps and capscrews.

Tube to Expansion Tank Capscrews 24 n.m [212 in-lb]

Hose Clamps 8 n.m [71 in-lb]

SMALL | MEDIUM | LARGE


Install the coolant vent line.

Torque Value:  15  n.m  [133 in-lb]

SMALL | MEDIUM | LARGE


Use Lubriplate™ paste on the o-rings and install them on each end of the sea water tube.

Install the lower sea water tube.

Install the 2 capscrews to the flanged end on the sea water coolant tube to the aftercooler.

Tighten the capscrews evenly to be sure the flat face of the flange mates evenly to the aftercooler.

Sea Water Tube to Expansion tank Capscrews 24 n.m [212 in-lb]

SMALL | MEDIUM | LARGE


Install the two clamps and capscrews to both sides of the heat exchanger sea water inlet connection.

Tighten the capscrews.

Sea Water Tube to Heat Exchanger Clamp Capscrews 24 n.m [212 in-lb]

SMALL | MEDIUM | LARGE


Connect the engine wiring harness to the coolant level sensor.

SMALL | MEDIUM | LARGE


Use Lubriplate™ paste on the o-ring and install it onto the marine gear oil cooler.

SMALL | MEDIUM | LARGE


Insert the marine gear oil cooler (end with o-ring) into the heat exchanger core.

Insert the marine gear oil cooler in as far as possible, then back it out as needed to secure the bracket.

Install and tighten the 2 capscrews.

Torque Value:  44  n.m  [32 ft-lb]

SMALL | MEDIUM | LARGE
   

Finishing Steps

TOC

 WARNING 

Coolant is toxic. Keep away from children and pets. If not reused, dispose of in accordance with local environmental regulations.

SMALL | MEDIUM | LARGE
Last Modified:  08-May-2008