Improper alignment of the propeller shaft can result in many problems. Vibration is usually the first indicator. Failure of the shaft seal or stuffing box can also occur. If damaged shaft seals, stuffing box, strut, cutlass bearing, or propeller are found, refer to an authorized OEM repair location.
Shaft alignment is checked when isolators are replaced, adjusted, or any time excessive vibration has been noticed. Also, any time the vessel has been taken out of the water and stored or blocked minor changes can take place in the shape of the hull. The shaft is checked and realigned as necessary after the vessel has been placed back in the water.
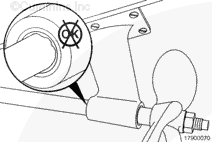
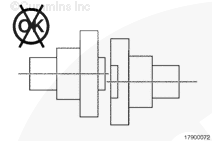
Inspect the propeller shaft for debris and burrs. Clean the propeller shaft.
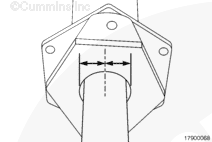
Check that the shaft is centered in the opening of the stuffing box flange. The specifications will vary by manufacturer. If any problems are noted, refer to an authorized OEM service location.
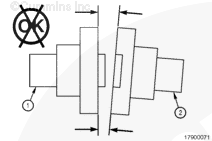
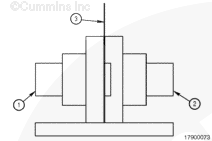
Use a feeler gauge (3) to check the alignment of the coupling in four different places, 90 degrees apart. The variation is to be within 0.051 to 0.102 mm [0.002 to 0.004 in].
If the flange is out of alignment the engine mounting will need to be adjusted until the alignment is correct. Refer to Engine Mounting/Drive Systems section in the Marine Recreational Installation Directions, Bulletin 3884649.
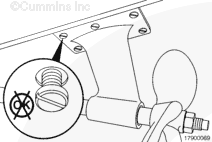
Make sure all mounting bolts and nuts are torqued to the proper specifications. Refer to Procedure 016-026, or the OEM literature.
Bolt the coupling in place and torque to the specifications for the capscrew and bolt size.
Capscrews, Bolts and Nuts Torque for Fine and Coarse Threads
SAE Grade 5
SAE Grade 8
(1) As Received
(2) Lubricated
(1) As Received
(2) Lubricated
N•m [ft-lb]
N•m [ft-lb]
N•m [ft-lb]
N•m [ft-lb]
1/4
12 ± 1 [9 ± 1]
9 ± 1 [7 ± 1]
19 ± 1 [14 ± 1]
15 ± 1 [11 ± 1]
5/16
26 ± 3 [19 ± 2]
20 ± 3 [15 ± 2]
37 ± 3 [27 ± 2]
30 ± 3 [22 ± 2]
3/8
45 ± 4 [33 ± 3]
37 ± 3 [27 ± 2]
62 ± 5 [46 ± 4]
52 ± 4 [38 ± 3]
7/16
71 ± 5 [52 ± 4]
54 ± 4 [40 ± 3]
99 ± 8 [73 ± 6]
81 ± 7 [60 ± 5]
1/2
108 ± 8 [80 ± 6]
88 ± 7 [65 ± 5]
152 ± 11 [112 ± 8]
122 ± 9 [90 ± 7]
9/16
152 ± 11 [112 ± 8]
112 ± 11 [90 ± 8]
214 ± 16 [158 ± 12]
176 ± 14 [130 ± 10]
5/8
214 ± 16 [158 ± 12]
176 ± 14 [130 ± 10]
304 ± 22 [224 ± 16]
244 ± 20 [180 ± 15]
3/4
380 ± 27 [280 ± 20]
305 ± 27 [225 ± 20]
529 ± 41 [390 ± 30]
434 ± 34 [320 ± 25]
7/8
607 ± 43 [448 ± 32]
488 ± 41 [360 ± 30]
854 ± 68 [630 ± 50]
691 ± 54 [510 ± 40]
1
922 ± 68 [680 ± 50]
732 ± 61 [540 ± 45]
1302 ± 95 [960 ± 70]
1051 ± 81 [775 ± 60]
1 1/8
1152 ± 81 [850 ± 60]
915 ± 81 [675 ± 60]
1844 ± 136 [1360 ± 100]
1491 ± 115 [1100 ± 85]
1 1/4
1593 ± 115 [1175 ± 85]
1254 ± 102 [925 ± 75]
2508 ± 203 [1850 ± 150]
2034 ± 169 [1500 ± 125]
Use for all capscrews, bolts, and nuts coated only with the fastener manufacturer’s rust preventive oil and use for parts wiped or washed nearly free of oil. Do not use for plated parts.
Use for all capscrews and nuts whose threads and washer faces are lubricated.
Hello, I'm Jack, a diesel engine fan and a blogger. I write about how to fix and improve diesel engines, from cars to trucks to generators. I also review the newest models and innovations in the diesel market. If you are interested in learning more about diesel engines, check out my blog and leave your feedback.
View all posts by Jack

;)
;)
;)
;)
;)
;)
;)
;)
;)
;)
;)
;)
;)
;)