View Related Topic
Preparatory Steps
TOC
WARNING
To reduce the possibility of severe personal injury or death when working on the fuel system, turn off the fuel supply at the vehicle’s main fuel shutoff valve before removing any component.
Before removing any component, turn off the fuel supply at the vehicle’s main fuel shutoff valve.
Start the engine and allow it to run at idle until it dies.
WARNING
Fuel is flammable. Keep all cigarettes, flames, pilot lights, arcing equipment, and switches out of the work area and areas sharing ventilation to reduce the possibility of severe personal injury or death when working on the fuel system.
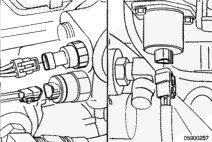
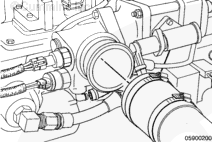
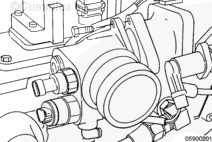
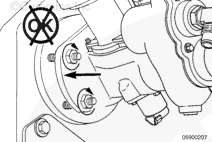
Remove the fuel supply line from the fuel control housing inlet.
Remove the two capscrews and fuel control valve.
Remove and discard the fuel control valve o-ring.
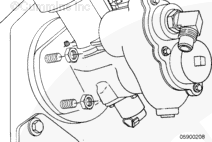
Remove the three capscrews, inlet elbow, and o-ring seal.
Discard o-ring seal.
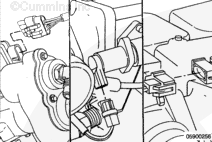
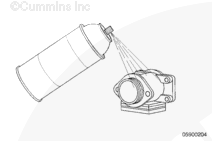
Hold the throttle body in place while removing the mixer.
Remove the four nuts and mixer from the throttle body.
Remove
TOC
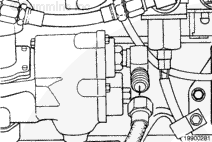
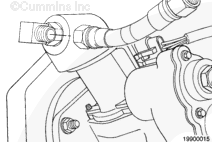
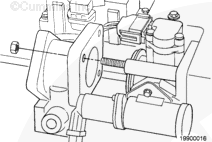
Remove the four mounting nuts.
Remove the fuel control housing assembly.
Disassemble
TOC
B5.9G
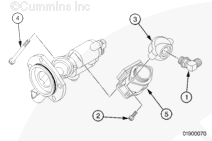
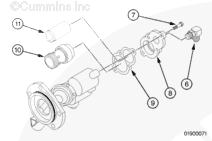
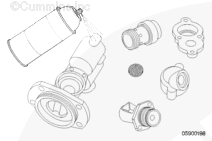
Remove the following parts from the fuel control housing:
Elbow (1)
Two screws (2)
Gas mass sensor connection adapter (3)
Four screws (4)
Gas mass flow sensor (5).
Discard all o-rings and replace with new.
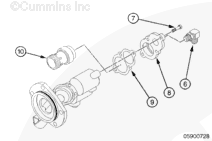
Remove the following parts from the fuel control housing:
Elbow (6)
Four screws (7)
Cover plate (8)
Gasket (9)
Pressure regulator valve (10)
Coalescent filter (if present) (11).
Discard the old gasket (9) and replace with new.
Discard the coalescent filter (11). Do not replace, it is now obsolete.
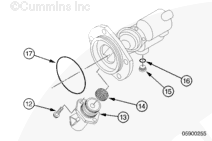
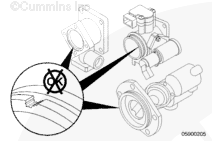
Remove the following parts from the fuel control housing:
Two screws (12)
Fuel shutoff valve (13)
Screen pack (14)
Plug (15)
O-ring (16)
Rectangular seal (17).
Discard the o-ring (16) and rectangular seal (17) and replace with new.
The screen pack can be cleaned using non-residue electrical cleaner, Part Number 3824510. The screen pack must be replaced if the mesh is damaged.
B5.9LPG
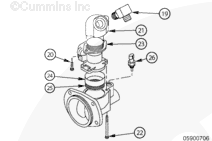
Remove the following parts from the fuel control housing:
Elbow (19)
Two screws (20)
Gas mass sensor connection adapter (21)
Four screws (22)
Gas mass flow sensor (23)
Screen retainer (24)
Screen pack (25)
Fuel pressure switch (26).
Discard all o-rings and replace with new.
The screen pack can be cleaned using non-residue electrical cleaner, Part Number 3824510. The screen pack must be replaced if the mesh is damaged.
B Gas Plus and B LPG Plus
Clean and Inspect for Reuse
TOC
WARNING
When using solvents, acids, or alkaline materials for cleaning, follow the manufacturer’s recommendations for use. Wear goggles and protective clothing to reduce the possibility of personal injury.
WARNING
Some solvents are flammable and toxic. Read the manufacturer’s instructions before using.
CAUTION
When cleaning the fuel control housing components, use Cummins safety solvent and degreaser, Part Number 3824510. Using other types of cleaners can cause damage to the plastic and electronic components in the fuel control housing.
Clean the following fuel control housing components:
Low-pressure regulator (Natural Gas only )
Fuel shutoff valve (Natural Gas only )
Screen pack
Fuel control housing
Rear cover plate (Natural Gas only )
Gas mass flow sensor connection adapter.
CAUTION
Do not remove the screen from the gas mass flow sensor. Permanent damage to assembly will occur.
Clean the gas mass flow sensor.
If the engine is experiencing a performance complaint due to oil contamination in the gas mass flow sensor, the sensor may have to be replaced.
Use cleaner, Part Number 3824510, to clean the screen pack.
Replace any part that can not be cleaned. Allow all parts to dry before installing.
Assemble
TOC
B5.9G
CAUTION
Any oil inside the gas mass flow sensor or on the screen pack will cause poor performance.
Apply a light coat of Lubriplate™, Part Number 3163086, on all o-rings before assembly.
Install the following parts on the fuel control housing:
Rectangular seal (17)
O-ring (16)
Plug (15)
Screen pack (14)
Fuel shutoff valve (13)
Two screws (12).
Torque Value: 7 n.m [62 in-lb]
All o-rings and rectangular seals must be replaced.
Install the following parts on the fuel control housing:
Pressure regulator valve (10)
Gasket (9)
Cover plate (8)
Four screws (7)
Elbow (6).
Torque Value: 7 n.m [62 in-lb]
Do not replace the coalescent filter, it is now obsolete.
Install the following parts on the fuel control housing:
Gas mass flow sensor (5)
Four screws (4)
Gas mass flow connection adapter (3)
Two screws (2)
Elbow (1).
Torque Value: 7 n.m [62 in-lb]
B5.9LPG
CAUTION
Any oil inside the gas mass flow sensor or on the screen pack will cause poor performance.
Apply a light coat of Lubriplate™, Part Number 3163086, on all o-rings before assembly.
Install the following parts on the fuel control housing:
Fuel pressure switch (26)
Screen pack (25)
Screen retainer (24)
Gas mass flow sensor (23)
Four screws (22)
Gas mass sensor connection adapter (21)
Two screws (20)
Elbow (19).
Torque Value: 7 n.m [62 in-lb]
All o-rings and rectangular seals must be replaced.
B Gas Plus and B LPG Plus
CAUTION
Any oil inside the gas mass flow sensor or on the screen pack will cause poor performance.
Apply a light coat of Lubriplate™, Part Number 3163086, on all o-rings before assembly.
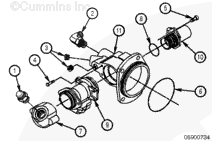
Install the following parts on the fuel control housing:
Screen pack (8)
Fuel shutoff valve (Natural Gas only ) (10)
Cover plate (LPG only ) (not shown)
Two screws (5)
Gas mass flow sensor (9)
Four screws (4)
Gas mass sensor connection adapter (7)
Two screws (5)
Fitting (1, 2).
Torque Value: 7 n.m [62 in-lb]
All o-rings and rectangular seals must be replaced.
Install
TOC
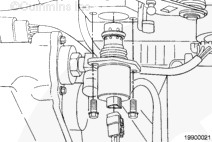
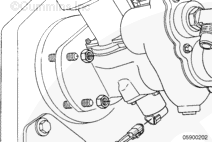
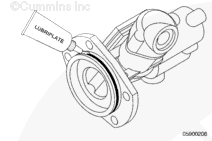
Install a new mounting sealing ring.
Apply a light coat of Lubriplate™, Part Number 3163086, on all o-rings before assembly.
CAUTION
Do not attempt to pull the fuel control housing into the housing with the mounting nuts as damage to the housing will occur.
Slide the fuel control housing forward on the mounting studs until the flange and sealing ring fit flush with the housing.
Install the mounting nuts.
Torque Value: 43 n.m [32 ft-lb]
Lubricate the sealing ring with Lubriplate™, Part Number 3163086.
Install the mixer and four nuts.
Torque Value: 18 n.m [159 in-lb]
Replace the fuel control valve o-rings with new o-rings.
Lubricate the fuel control valve o-ring with a small amount of Lubriplate™, Part Number 3163086.
Install the fuel control valve and two capscrews.
Torque Value: 7 n.m [62 in-lb]
Finishing Steps
TOC
Replace the inlet elbow o-ring with a new o-ring.
Lubricate the o-ring with a small amount of Lubriplate™, Part Number 3163086.
Install the inlet elbow o-ring seal and three capscrews.
Torque Value: 18 n.m [159 in-lb]
CAUTION
Be sure to use two wrenches when tightening the hose. Twisting and damage will occur to the fuel jumper hose if only one wrench is used.
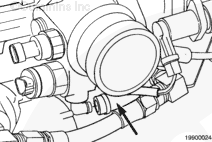
Connect the fuel jumper hose to the mixer and fuel control housing.
Torque Value: 77 n.m [57 ft-lb]
Connect the fuel supply line to the fuel control housing inlet.
Torque Value: 77 n.m [57 ft-lb]
WARNING
Fuel is flammable. Keep all cigarettes, flames, pilot lights, arcing equipment, and switches out of the work area and areas sharing ventilation to reduce the possibility of severe personal injury or death when working on the fuel system.
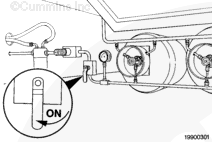
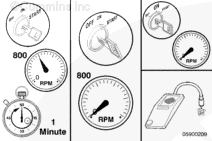
Turn on the vehicle’s main fuel supply line.
Start the engine and let idle for one minute.
Shut off the engine.
Turn the key to the ON position only (do not
If leaks are found, close the valve, turn the key to the OFF position, and repair leaks.
Last Modified: 30-Oct-2002
Published by Jack
Hello, I'm Jack, a diesel engine fan and a blogger. I write about how to fix and improve diesel engines, from cars to trucks to generators. I also review the newest models and innovations in the diesel market. If you are interested in learning more about diesel engines, check out my blog and leave your feedback.
View all posts by Jack
 WARNING
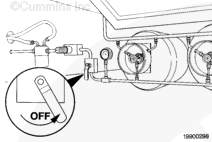

 CAUTION


;)
;)
;)
;)
;)
;)
;)
;)
;)
;)
;)
;)
;)
;)
;)
;)
;)
;)
;)
;)
;)
;)
;)
;)
;)
;)
;)
;)
;)
;)
;)
;)
;)
;)
;)
;)
;)
;)
;)
;)
;)
;)
;)
;)
;)
;)
;)
;)
;)
;)