Centinel System – Master Repair Manual – 019-130   Centinel™ Control Module

Remove

TOC

CELECT™ or CELECT™ Plus


Disconnect the wiring harness connector from the Centinel™ control module.

SMALL | MEDIUM | LARGE


Remove the two capscrews that hold the Centinel™ control module to the make-up oil tank.

Remove the Centinel™ control module.

SMALL | MEDIUM | LARGE
   

PT or STC


Remove the 28-pin connector to the Centinel™ control module.

SMALL | MEDIUM | LARGE


Remove the Centinel™ mounting bracket. Refer to Procedure 007-090.

SMALL | MEDIUM | LARGE


Remove the Centinel™ control module.

SMALL | MEDIUM | LARGE
   

K19, K38, and K50 Engines


Disconnect the wiring harness connector from the Centinel™ control module.

SMALL | MEDIUM | LARGE


NOTE: Depending on the installation, it will possibly be necessary to remove the control valve and mounting bracket from the engine to remove the Centinel™
control module.

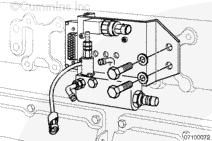
Remove the four capscrews that hold the Centinel™ control module to the mounting bracket.

Remove the Centinel™ control module.

SMALL | MEDIUM | LARGE
   

Install

TOC

 CAUTION 

To avoid damage to the Centinel™ control module, do not blow compressed air into the Centinel™ control module connector. Compressed air can contain moisture due to condensation.

Use quick-dry electrical contact cleaner, Part Number 3824510, to remove all dirt and moisture from the Centinel™ control module connector port and the harness connector.

SMALL | MEDIUM | LARGE
   

CELECT™ or CELECT™ Plus


Install the Centinel™ control module to the make-up oil tank. Tighten the six capscrews.

Torque Value:  7  n.m  [62 in-lb]

SMALL | MEDIUM | LARGE
   

PT or STC


Install the Centinel™ control module (1) to the mounting bracket
(2) with four 1/4-20 x 3/4-inch captive washer capscrews.

Tighten the capscrews.

Torque Value:  7  n.m  [62 in-lb]

SMALL | MEDIUM | LARGE
   

K19, K38, and K50 Engines


 CAUTION 

To avoid damage to the Centinel™ control module, make sure there is no grease or dirt between the Centinel™ control module and the mounting surface.

Install the new Centinel™ control module to the mounting bracket. Tighten the four capscrews.

Torque Value:  8  n.m  [71 in-lb]

SMALL | MEDIUM | LARGE
   

Finishing Steps

TOC

If necessary, install the Centinel™ control module mounting bracket. Refer to Procedure 007-090.

Install the wiring harness connector to the Centinel™ control module. Refer to Procedure 019-131.

SMALL | MEDIUM | LARGE
Last Modified:  22-Apr-2004