Centinel System – Repair Manual – 008-062   Water Pump

Install

TOC

Automotive with CM870


 CAUTION 

Do not use petroleum based lubricants. Petroleum based lubricants cause the o-ring seals to crack, leading to a coolant leak.

Lubricate and install the new o-ring seal.

Install the two guide studs.

Install the water pump and three capscrews.

SMALL | MEDIUM | LARGE


Remove the two guide studs and install the remaining mounting capscrews.

Tighten the capscrews.

Torque Value:  72  n.m  [53 ft-lb]

SMALL | MEDIUM | LARGE
   

Automotive with CM570


Install a new o-ring seal in the water inlet.

Install the two guide studs.

SMALL | MEDIUM | LARGE


 CAUTION 

Do not use petroleum based lubricants. Petroleum based lubricants cause the o-ring seals to crack, leading to a coolant leak.

Install a new o-ring seal in the water pump outlet groove.

Apply a thin layer of non-petroleum-based lubricant, such as vegetable oil, to both o-ring seals.

SMALL | MEDIUM | LARGE


Use clean engine oil to lubricate the threads and bottom of the capscrew heads of all the water pump capscrews.

Install the water pump and two lower capscrews.

Tighten the capscrews to hold the pump in place.

SMALL | MEDIUM | LARGE


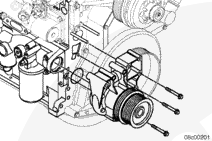
NOTE: Some configurations do not use the middle aluminum belt tensioner bracket shown. Refer to Procedure for the appropriate tensioner bracket installation.

Install the belt tensioner bracket, if equipped, and capscrews in the location shown.

Finger tighten all capscrews.

SMALL | MEDIUM | LARGE


Tighten the water pump mounting capscrews in the sequence and values shown.

Capscrews 1, 2, and 3 58 n.m [43 ft-lb]
Capscrews 4 and 5 72 n.m [53 ft-lb]
All Capscrews, Engines Without Belt Tensioner Bracket 72 n.m [53 ft-lb]

SMALL | MEDIUM | LARGE
   

Industrial CM570 and Power Generation without CM570


Install a new o-ring seal in the water inlet.

Install the two guide studs.

SMALL | MEDIUM | LARGE


 CAUTION 

Do not use petroleum based lubricants. Petroleum based lubricants cause the o-ring seals to crack, leading to a coolant leak.

Install a new o-ring seal in the water pump outlet groove.

Apply a thin layer of non-petroleum-based lubricant, such as vegetable oil, to both o-ring seals.

SMALL | MEDIUM | LARGE


Use clean engine oil to lubricate the threads and bottom of the capscrew heads of all the water pump capscrews.

Position the water pump on the engine.

Install the bottom two capscrews finger tight.

SMALL | MEDIUM | LARGE


NOTE: Some configurations do not use the middle aluminum belt tensioner bracket. Refer to Procedure 008-088 for the appropriate tensioner bracket installation.

NOTE: Early engines that did not have a slotted hole on the middle aluminum belt tensioner idler bracket required the vibration dampers to be removed to remove and install the water pump.

Install the belt tensioner bracket, if equipped, and the capscrews in the locations shown.

Finger tighten all capscrews.

SMALL | MEDIUM | LARGE


Tighten the water pump mounting capscrews in the sequence and values shown.

Capscrews 1, 2, and 3 58 n.m [43 ft-lb]
Capscrews 4 and 5 72 n.m [53 ft-lb]
All Capscrews, Engines Without Belt Tensioner Bracket 72 n.m [53 ft-lb]

SMALL | MEDIUM | LARGE


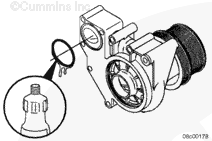
Align the idler pulley (1) and the shaft of the pilot adapter (2) with the belt tensioner bracket (3) using the guide pin on the pilot adapter (4), if equipped.

Install the belt idler pulley and shaft on the belt idler bracket using one washer and capscrew.

Tighten the capscrew.

Torque Value:  30  n.m  [25 ft-lb]

Install the dust seal.

SMALL | MEDIUM | LARGE
   

Automotive With CM871


 CAUTION 

Do not use petroleum based lubricants, petroleum based lubricants cause the o-ring to crack or swell, leading to a coolant leak.

Install a new water pump inlet o-ring seal and a new EGR tube outlet o-ring seal.

Install the five water pump housing capscrews.

Tighten the capscrews.

Torque Value:  72  n.m  [53 ft-lb]

Install the two bracket capscrews.

Tighten the capscrews.

Torque Value:  30  n.m  [25 ft-lb]

Install the EGR tube outlet capscrew.

Tighten the capscrew.

Torque Value:  30  n.m  [25 ft-lb]

SMALL | MEDIUM | LARGE
Last Modified:  01-Jun-2006