This component or assembly weighs greater than 23 kg [50 lb]. To prevent serious personal injury, be sure to have assistance or use appropriate lifting equipment to lift this component or assembly.
Disconnect the driveline. Remove the transmission and clutch. Refer to the manufacturer’s instructions.
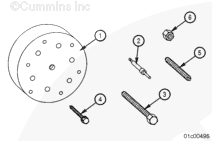
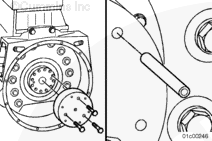
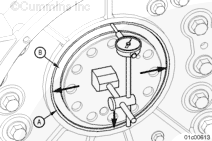
Use three flywheel mounting capscrews to secure the replacer plate (1) to the crankshaft.
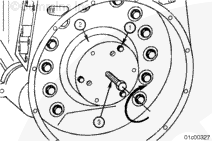
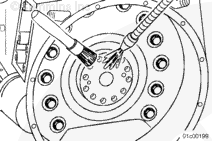
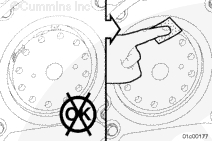
Install a pilot drill (2) into one of the holes in the rear crankshaft seal tool and drill a hole through the seal casing.
Remove the pilot drill (2) and repeat the procedure for at least two more evenly spaced holes of the rear crankshaft seal tool. As many as six holes may be drilled to assist in removing the rear crankshaft seal.
NOTE: Three stud screws (3) and three hex nuts (4) are required for some engines with flywheel mounting capscrews that are too short to mount the replacer plate (1) to the crankshaft.
NOTE: Three guide pins, Part Number 3164765, are required on REPTO applications to support the REPTO crankshaft gear and the replacer plate.
When using solvents, acids, or alkaline materials for cleaning, follow the manufacturer’s recommendations for use. Wear goggles and protective clothing to avoid personal injury.
WARNING
Some solvents are flammable and toxic. Read the manufacturer’s instructions before using.
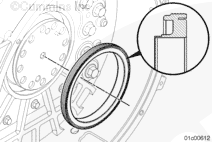
Clean the seal bore surface of the flywheel housing.
Never use a hammer or mallet to install the seal. Damage to the seal can occur.
Do not use lubricants to install the seal. Apply a 10-percent soap solution to the outer-ribbed surface of the seal.
Guide the rear crankshaft seal (1), spacer (2), and replacer plate (3) over the crankshaft.
NOTE: Spacer, Part Number 4918688, is used to make sure of the correct installation depth of the crankshaft seal. The flat side of the spacer should contact the crankshaft seal during installation.
NOTE: Three guide pins, Part Number 3164765, are required on REPTO applications to support the REPTO crankshaft gear and the replacer plate.
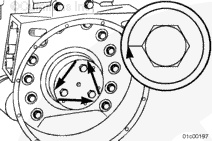
Measure the protrusion of the outer rubber portion (A) of the seal relative to the inner metal portion of the seal (B).
Set the dial indicator to zero on the inner metal portion of the seal.
Measure and record the protrusion of the outer rubber portion of the seal. Repeat the measurement in four locations equally spaced around the crankshaft seal.
The protrusion measurement at each location must be within +/- 1 mm [+/- 0.04 in]. The difference between any of the four protrusion measurements must be within +/- 0.5 mm [0.02 in].
If either of these conditions are not met, the rear crankshaft seal must be removed and a new seal installed.
This component or assembly weighs greater than 23 kg [50 lb]. To prevent serious personal injury, be sure to have assistance or use appropriate lifting equipment to lift this component or assembly.
Hello, I'm Jack, a diesel engine fan and a blogger. I write about how to fix and improve diesel engines, from cars to trucks to generators. I also review the newest models and innovations in the diesel market. If you are interested in learning more about diesel engines, check out my blog and leave your feedback.
View all posts by Jack
 WARNING


 CAUTION
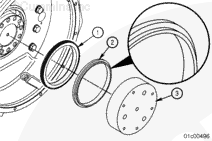


;)
;)
;)
;)
;)
;)
;)
;)
;)
;)
;)
;)
;)
;)
;)
;)
;)
;)
;)
;)