To protect the environment, liquid refrigerant systems must be properly emptied and filled using equipment that prevents the release of refrigerant gas into the atmosphere. Federal law requires capturing and recycling the refrigerant.
Remove the cooling fan drive belt. Refer to Procedure 008-002.
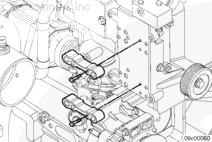
Remove the refrigerant compressor belt. Refer to Procedure 009-052.
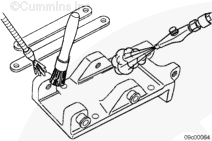
Remove the refrigerant compressor. Refer to Procedure 009-051.
Automotive, Industrial with CM570 and Power Generation without CM570
WARNING
To protect the environment, liquid refrigerant systems must be properly emptied and filled using equipment that prevents the release of refrigerant gas into the atmosphere. Federal law requires capturing and recycling the refrigerant.
Remove the refrigerant compressor and alternator belt. Refer to Procedure 013-005.
Remove the refrigerant compressor. Refer to Procedure 009-051.
When using solvents, acids, or alkaline materials for cleaning, follow the manufacturer’s recommendations for use. Wear goggles and protect clothing to reduce the possibility of personal injury.
WARNING
Wear appropriate eye and face protection when using compressed air. Flying debris and dirt can cause personal injury.
Clean the refrigerant compressor mounting brackets with solvents.
Dry with compressed air.
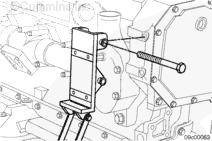
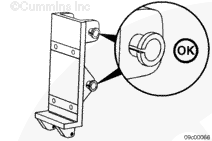
Inspect the refrigerant compressor mounting brackets.
Replace the refrigerant compressor mounting brackets if cracked or damaged.
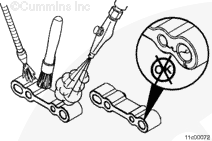
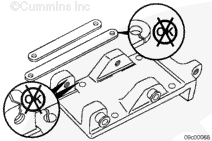
Inspect the roll pins. The roll pins must not be loose or have any damage. Replace the refrigerant compressor mounting brackets, if the roll pins are loose or damaged.
Automotive, Industrial with CM570 and Power Generation without CM570
WARNING
When using solvents, acids, or alkaline materials for cleaning, follow the manufacturer’s recommendations for use. Wear goggles and protective clothing to reduce the possibility of personal injury.
WARNING
Wear appropriate eye and face protection when using compressed air. Flying debris and dirt can cause personal injury.
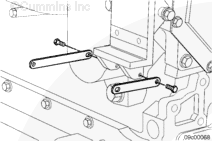
Clean the bracket, links, and mounting capscrews with solvent.
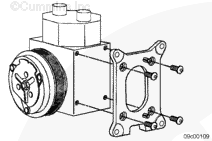
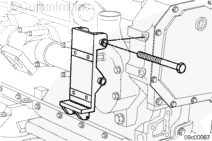
Install the refrigerant compressor mounting bracket to the refrigerant compressor. The refrigerant compressor is positioned on top of the bracket ledge.
Install the four mounting capscrews and the refrigerant compressor bracket.
Hello, I'm Jack, a diesel engine fan and a blogger. I write about how to fix and improve diesel engines, from cars to trucks to generators. I also review the newest models and innovations in the diesel market. If you are interested in learning more about diesel engines, check out my blog and leave your feedback.
View all posts by Jack
 WARNING


;)
;)
;)
;)
;)
;)
;)
;)
;)
;)
;)
;)
;)
;)
;)
;)
;)
;)
;)
;)
;)
;)