|
Engine Oil Temperature – High Critical
|

Overview
| CODE | REASON | EFFECT |
| Fault Code: 214 PID: P175 SPN: 175 FMI: 0 LAMP: Red SRT: |
High Oil Temperature – Over Temperature. |
Progressive power derate increasing in severity from the time of alert. If Engine Protection Shutdown feature is enabled, engine will shut down 30 seconds after red stop lamp starts flashing. |
|
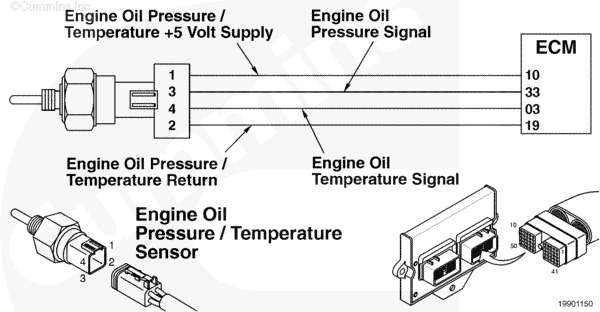
Engine Oil Temperature Sensor Circuit |
 |
Circuit Description
The electronic control module (ECM) uses this combination pressure/temperature sensor for engine protection purposes.
Component Location
The engine oil pressure/temperature sensor is located in the block, on the fuel system side of the engine.
Shop Talk
All temperature sensors:
- The resistance of the sensor varies with temperature. The reading observed must compare to the following table if the sensor is functioning properly.
| Temperature (°C) | Temperature [°F] | Resistance (ohms) |
| 0 | 32 | 30k to 36k |
| 25 | 77 | 9k to 11k |
| 50 | 122 | 3k to 4k |
| 75 | 167 | 1350 to 1500 |
| 100 | 214 | 600 to 675 |
The engine protection shutdown for oil temperature is a customer feature and will only be enabled at the customer’s request. This feature will deactivate or disable the fuel control valve if this feature is utilized by the OEM.
Cautions and Warnings
 CAUTION CAUTION To reduce the possibility of pin and harness damage, use the following test leads when taking a measurement: |
Troubleshooting Steps
| STEPS | SPECIFICATIONS | |
|---|---|---|
| STEP 1. | Check the fault codes. | |
| STEP 1A. Read the fault codes. | Fault Code 214 active? | |
| STEP 2. | Check the engine oil pressure/temperature sensor. | |
| STEP 2A. Inspect the engine harness and engine oil pressure/temperature sensor connector pins. | Dirty or damaged pins? | |
| STEP 2B. Read the fault codes. | Fault Code 214 active? | |
| STEP 2C. Verify engine oil temperature sensor. | Does temperature differ more than 5 degrees? | |
| STEP 2D. Check the resistance of the sensor. | 300 to 90k ohms? | |
| STEP 2E. Read the fault codes. | Fault Code 214 active? | |
| STEP 3. | Clear the fault codes. | |
| STEP 3A. Disable the fault code. | Fault Code 214 inactive? | |
| STEP 3B. Clear the inactive fault codes. | All fault codes cleared? | |
Guided Step 1 – Check the fault codes.
| Guided Step 1A – Read the fault codes. | |
|---|---|
Conditions
Action
|
|
|
Fault Code 214 active? |
|
| YES | NO |
| No Repair | No Repair |
Guided Step 2 – Check the engine oil pressure/temperature sensor.
| Guided Step 2A – Inspect the engine harness and engine oil pressure/temperature sensor connector pins. | |
|---|---|
Conditions
Action
Refer to the circuit diagram or wiring diagram for component pin identification. For general inspection techniques, refer to Component Connector and Pin Inspection, Procedure 019-361. |
|
|
Dirty or damaged pins? |
|
| YES | NO |
| No Repair |
Repair the damaged pins. Repair or replace the engine harness, or replace the sensor, whichever has the damaged pins.
|
| Guided Step 2B – Read the fault codes. | |
|---|---|
Conditions
Action
|
|
|
Fault Code 214 active? |
|
| YES | NO |
| No Repair | No Repair |
| Guided Step 2C – Verify engine oil temperature sensor. | |
|---|---|
Conditions
Action
|
|
|
Does temperature differ more than five degrees? |
|
| YES | NO |
| No Repair | No Repair |
| Guided Step 2D – Check the resistance of the sensor. | ||
|---|---|---|
Conditions
Action
|
|
|
|
300 to 90k ohms? |
||
| YES | NO | |
| No Repair |
Replace the sensor. Refer to Procedure 019-155. |
|
;)
;)
;)
;)
| Guided Step 2E – Read the fault codes. | |
|---|---|
Conditions
Action
|
|
|
Fault Code 214 active? |
|
| YES | NO |
|
Refer to the Oil Temperature Above Normal troubleshooting symptom chart in Section TS in the Troubleshooting and Repair Manual, C8.3G (Natural Gas) Engines, Bulletin 3666206, or in the Troubleshooting and Repair Manual, B5.9G B5.9LPG, B Gas Plus and B LPG Plus Engines, Bulletin 3666164. |
No Repair |
|
Oil Temperature Above Normal troubleshooting symptom chart
|
|
Guided Step 3 – Clear the fault codes.
| Guided Step 3A – Disable the fault code. | |
|---|---|
Conditions
Action
|
|
|
Fault Code 214 inactive? |
|
| YES | NO |
| No Repair |
Troubleshooting procedures need to be repeated from the beginning. |
| Guided Step 3B – Clear the inactive fault codes. | |
|---|---|
Conditions
Action
|
|
|
All fault codes cleared? |
|
| YES | NO |
| No Repair |
Troubleshoot any remaining active fault codes. |
|
Repair complete
|
Appropriate troubleshooting charts
|