ISC, ISCe, QSC8.3, ISL, ISLe3, ISLe4 and QSL9 Engines – 005-090   Fuel Pump Rate Shape Tube

Preparatory Steps

TOC

 WARNING 

When using solvents, acids, or alkaline materials for cleaning, follow the manufacturer’s recommendations for use. Wear goggles and protective clothing to reduce the possibility of personal injury.
 WARNING 

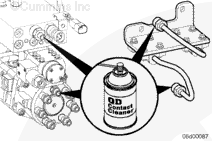
Some solvents are flammable and toxic. Read the manufacturer’s instructions before using.
 WARNING 

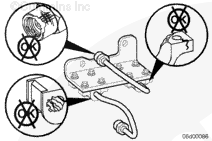
Wear appropriate eye and face protection when using compressed air. Flying debris and dirt can cause personal injury.
 CAUTION 

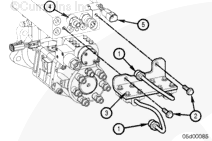
Make sure that direct steam spray stream does not contact the electrical connections on the top of the accumulator block; fault codes will possibly occur.

Thoroughly steam-clean the entire fuel pump.

Dry the fuel pump with compressed air.

 
SMALL | MEDIUM | LARGE

Remove

TOC

Loosen the two rate shape tube nuts (1).

Remove the two bracket capscrews (2).

Remove the rate shape tube assembly.

Do not loosen or remove the isolator capscrews (3).

SMALL | MEDIUM | LARGE
   

Clean and Inspect for Reuse

TOC

Clean the ends of the rate shape tube.

Clean out the rate shape tube with contact cleaner if debris is suspected of entering the tube.

Flush any dirt from the snubber fitting and distributor inlet fitting.

Use QD contact cleaner, Part Number 3824510.

SMALL | MEDIUM | LARGE


Inspect isolators for signs of wear or cracks.

Replace the rate shape tube assembly if any isolator is worn, cracked, or missing.

Inspect the ends of the rate shape tube for damage.

SMALL | MEDIUM | LARGE
   

Install

TOC

Install the rate shape tube assembly using the following steps:

  1. Install the tube nuts (1) and capscrews (2) finger tight
  2. Tighten the rate shape tube nuts (1)
Torque Value:  46  n.m  [34 ft-lb]
  1. Tighten the two bracket capscrews (2).
Capscrew 41 n.m [30 ft-lb]
Thermistor Adapter 34 n.m [25 ft-lb]

NOTE: If any force is required to flex the rate shape tube in order to start the tube nuts, the rate shape tube must be replaced with a new tube.

NOTE: Make sure the harness clip is installed between the bracket and capscrew, not between the bracket and accumulator.

SMALL | MEDIUM | LARGE
   

Finishing Steps

TOC

Start the engine and check for fuel leaks at the rate shape tube connections.

 
SMALL | MEDIUM | LARGE
Last Modified:  17-Jun-2003