Centinel System – Repair Manual – 001-052   Vibration Damper, Viscous

View Related Topic


Install

TOC

Automotive Applications


Make sure the mounting surfaces of the crankshaft nose, vibration damper, and the pulley are clean, dry, and free from burrs.

Install two guide studs into the crankshaft nose.

Align the dowel pin in the crankshaft wit the dowel hole in the vibration damper.

Install the vibration damper, pulley, and clamping plate onto the guide plate.

SMALL | MEDIUM | LARGE


Use clean 15W-40 oil to lubricate the capscrew threads.

Install 10 capscrews.

Remove the two guide studs and install the remaining capscrews.

Tighten the capscrews in a star pattern.

Torque Value:  175  n.m  [130 ft-lb]

SMALL | MEDIUM | LARGE
   

Industrial and Power Generation with Crank-Driven Fan or PTO


Make sure the mounting surfaces of the crankshaft nose, vibration dampers, mounting spacer, and pulley are clean, dry, and free from burrs.

Install two guide studs into the crankshaft nose.

SMALL | MEDIUM | LARGE


Install one of the vibration dampers (1), mounting spacer (2), second vibration damper (3), and the pulley (4) onto the guide studs.

SMALL | MEDIUM | LARGE


Lubricate the capscrew threads with clean 15W-40 oil.

Install four capscrews.

Remove the two guide studs and install the remaining two capscrews.

Tighten the six capscrews in a star pattern.

Torque Value:  175  n.m  [130 ft-lb]

SMALL | MEDIUM | LARGE


Install the crankshaft adapter (1).

Make sure the crank shaft adapter sets flush against the pulley (2).

Lubricate the capscrew threads with clean 15W-40 oil.

Install the six capscrews and tighten in a star pattern.

Torque Value:  175  n.m  [130 ft-lb]

SMALL | MEDIUM | LARGE
   

Industrial and Power Generation without Crank-Driven Fan or PTO


Make sure the mounting surfaces of the crankshaft nose, vibration dampers, mounting spacer, and pulley are clean, dry, and free from burrs.

Install two guide studs into the crankshaft nose.

SMALL | MEDIUM | LARGE


Install one of the vibration dampers (1), mounting spacer (2), second vibration damper (3), and the pulley (4) onto the guide studs.

SMALL | MEDIUM | LARGE


Lubricate the capscrew threads with clean 15W-40 oil.

Install 10 capscrews.

Remove the two guide studs and install the two remaining capscrews.

Tighten the 12 capscrews in a star pattern.

Torque Value:  175  n.m  [130 ft-lb]

SMALL | MEDIUM | LARGE
   

Eccentricity Check

TOC

All Applications


Clean the outside surface of the vibration damper.

To measure the vibration damper eccentricity (out of round), install a dial indicator onto the gear cover as indicated.

Rotate the crankshaft with the accessory driveshaft one complete revolution (360 degrees), and record the total indicator movement.

Vibration Damper Eccentricity
mm in
0.28 MAX 0.011

If the vibration damper is
not within specifications, it
must be replaced.

SMALL | MEDIUM | LARGE
   

Wobble Check

TOC

All Applications


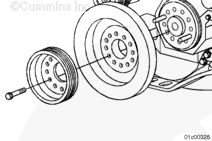
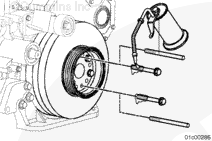
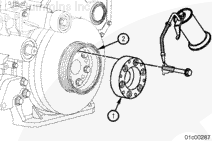
To measure wobble (face alignment), install a dial indicator as shown.

Push the crankshaft to the front or rear of the engine and set the indicator to “0” (zero).

Rotate the crankshaft one complete revolution (360 degrees) while maintaining the position of the crankshaft, either toward the front or rear of the engine.

Record the total indicator movement.

Vibration Damper Wobble Measurement
mm in
0.28 MAX 0.011

If the vibration damper is
not within specifications, it
must be replaced.

SMALL | MEDIUM | LARGE
Last Modified:  22-Feb-2007