When using solvents, acids, or alkaline materials for cleaning, follow the manufacturer’s recommendations for use. Wear goggles and protective clothing to reduce the possibility of personal injury.
WARNING
Wear appropriate eye and face protection when using compressed air. Flying debris and dirt can cause personal injury.
CAUTION
Do not allow dirt or foreign material to enter oil passages in the cooler element when cleaning. Rod bearing failures can be caused if debris is introduced into the lube cooler housing oil passages.
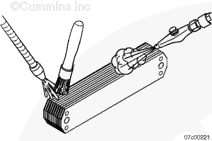
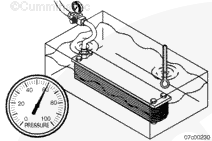
NOTE: An oil cooler element pressure test plate can be constructed from a thin aluminum plate that allows the oil cooler element to be mounted and air pressure applied to the element inlet. An oil cooler pressure test tool does not exist.
Install the oil cooler element and gaskets to the pressure test plate.
Replace the oil cooler element if a steady stream of bubbles is observed from the element.
Slow forming bubbles (less than one rising to the surface of the water every 30 seconds) do not constitute a leaking oil cooler element.
Do not replace non-leaking oil cooler elements. If no oil cooler element leaks are found install the existing oil cooler element with new gaskets and new capscrews.
To clean contaminated lubricating oil from the engine, refer to Procedure 007-037.
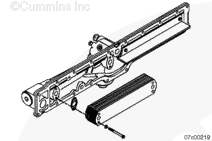
The single-element oil cooler assembly is for use only on ISX1 and ISX2 engines. Engine oil overheating can result if used on ISX3, and Signature 600 engines.
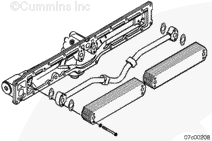
Install non-leaking lubricating oil cooler elements onto the lubricating oil filter head with new gaskets and capscrews.
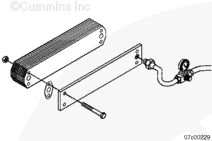
Assemble the cooler element(s) to the housing with the following parts from the engine oil cooler kit.
Engine Oil Cooler Kit Contents
Quantity
Description
4
Capscrews (short)
2
Capscrews (long)
3
Gaskets (rubber flash)
Install and tighten the capscrews.
Torque Value: 20 n.m [15 ft-lb]
Install the lubricating oil cooler assembly. Refer to Procedure 007-003.
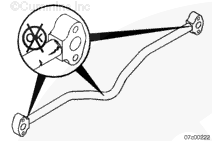
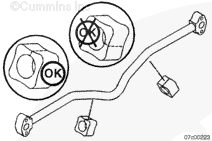
NOTE: The vibration isolators must be cut to allow assembly over the cooler tube. Make sure the vibration isolators are oriented so the slit is not tightened against the oil cooler housing or the oil cooler elements.
Install two new vibration isolators onto the oil cooler tube as shown.
Hello, I'm Jack, a diesel engine fan and a blogger. I write about how to fix and improve diesel engines, from cars to trucks to generators. I also review the newest models and innovations in the diesel market. If you are interested in learning more about diesel engines, check out my blog and leave your feedback.
View all posts by Jack


 CAUTION
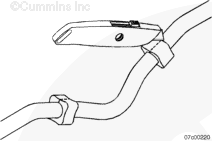
 WARNING


;)
;)
;)
;)
;)
;)
;)
;)
;)
;)
;)
;)
;)
;)
;)
;)
;)
;)