ISM, ISMe, and QSM11 – 001-036   Idler Gear, Camshaft

Preparatory Steps

TOC

SMALL | MEDIUM | LARGE

Remove

TOC

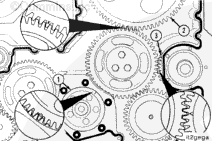
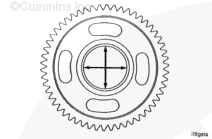
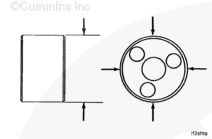
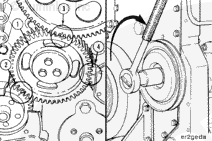
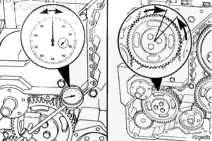
Before removing the idler gear, use the accessory driveshaft to rotate the crankshaft until the timing marks on the crankshaft gear (1), camshaft gear (2), and accessory drive gear (3) are completely engaged in the camshaft idler gear.

NOTE: Due to the camshaft idler gear having more gear teeth than the crankshaft gear, the camshaft idler gear timing marks will not align with the crankshaft, camshaft, and accessory drive gears timing marks on every engine revolution.

SMALL | MEDIUM | LARGE


Three idler gear assemblies are used:

  • Water pump idler gear (1)
  • Camshaft idler gear (2)
  • Hydraulic pump idler gear (3).

SMALL | MEDIUM | LARGE


To remove the camshaft idler gear assembly, remove:

  • The three capscrews
  • Cover plate (4)
  • Front thrust bearing (5)
  • Idler gear (6)
  • Rear thrust bearing (7)
  • Idler gear shaft (8)
  • Wear plate (9).

SMALL | MEDIUM | LARGE


Mark or tag the individual pieces of the idler gear assembly and attach them together.

SMALL | MEDIUM | LARGE
   

Clean and Inspect for Reuse

TOC

 WARNING 

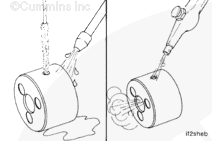
When using solvents, acids, or alkaline materials for cleaning, follow the manufacturer’s recommendations for use. Wear goggles and protective clothing to reduce the possibility of personal injury.
 WARNING 

Wear appropriate eye and face protection when using compressed air. Flying debris and dirt can cause personal injury.

Clean the parts with solvent.

Dry with compressed air.

SMALL | MEDIUM | LARGE


 WARNING 

Wear appropriate eye and face protection when using compressed air. Flying debris and dirt can cause personal injury.

Use a bristle brush to clean the oil drillings in the idler gear shaft.

Blow out the oil drillings with compressed air.

SMALL | MEDIUM | LARGE


Use a straightedge to inspect the retaining capscrews for necking. If necking is observed, do not reuse the capscrews. They must be replaced.

SMALL | MEDIUM | LARGE


Inspect the idler gear for chipped, broken, or cracked teeth.

SMALL | MEDIUM | LARGE


Measure the inside diameter of the idler gear bushing bore.

Camshaft Idler Gear Bushing Bore Inside Diameter

mm in
60.045 MIN 2.3640
60.100 MAX 2.3661

SMALL | MEDIUM | LARGE


Measure the outside diameter of the idler gear shaft.

Camshaft Idler Gear Shaft Outside Diameter

mm in
59.975 MIN 2.3612
60.008 MAX 2.3625

SMALL | MEDIUM | LARGE


Measure the outside diameter of the camshaft idler shaft ring dowel.

Camshaft Idler Ring Dowel Outside Diameter

mm in
19.217 MIN 0.7566
19.243 MAX 0.7576

SMALL | MEDIUM | LARGE


Measure the thrust washer thickness in three places 120-degrees apart.

Camshaft Idler Thrust Washer Thickness

mm in
2.400 MIN 0.0945
2.470 MAX 0.0972

SMALL | MEDIUM | LARGE


Flex the thrust washers approximately 3 to 6 mm [1/8 to 1/4 in], and inspect the surfaces for cracks.

SMALL | MEDIUM | LARGE
   

Install

TOC

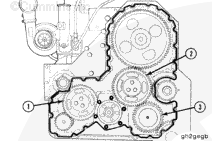
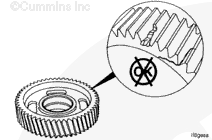
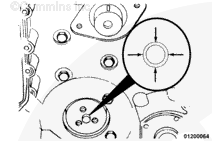
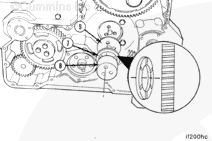
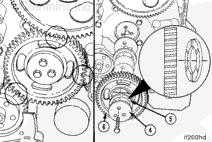
When installing the camshaft idler gear (1), make certain the timing mark “0”on the crankshaft gear (2), timing mark “X” on the camshaft gear (3), and timing mark “V” on the accessory drive gear (4) are aligned as shown.

The marks on the idler gears must match the same mark on each of the other gears.

SMALL | MEDIUM | LARGE


 CAUTION 

The grooved side of the rear thrust bearing must be facing toward the gear to prevent damage to the gear and engine during engine operation.

NOTEOnly the camshaft idler gear has a wear plate.

Use Lubriplate™ 105 or equivalent, to lubricate the wear plate, thrust bearing, and idler gear.

Install the camshaft idler gear wear plate (9).

Install the idler gear shaft (8) and rear thrust bearing (7).

SMALL | MEDIUM | LARGE


 CAUTION 

The grooved side of the front thrust bearing must be facing toward the gear to prevent damage to the gear and engine during engine operation.

Align the timing marks and install the idler gear (6), front thrust bearing (5), and gear retainer (4).

Install the retaining capscrews and tighten.

Torque Value:

  1. 61 n.m   
    [45 ft-lb]
  2. Rotate 60 degrees

SMALL | MEDIUM | LARGE


The following idler gear end clearance and backlash checks apply to all three idler gears. The same MINIMUM and MAXIMUM values apply, also.

Use a dial indicator gauge with a magnetic base to measure the idler gear end clearance.

Place the contact tip of the gauge against the face of the idler gear.

Idler Gear End Clearance

mm in
0.30 MIN 0.012
0.53 MAX 0.021

SMALL | MEDIUM | LARGE


Use a dial indicator gauge with a magnetic base to measure the idler gear backlash.

Place the contact tip of the gauge against a tooth on the idler gear.

NOTE: Do not allow the mating gears to move while measuring the backlash.

Idler Gear Backlash

mm in
0.08 MIN 0.003
0.38 MAX 0.015

SMALL | MEDIUM | LARGE
   

Finishing Steps

TOC

SMALL | MEDIUM | LARGE
Last Modified:  21-Jan-2009