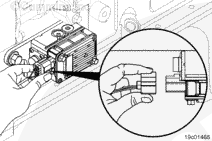
Disconnect the electrical harness from the turbocharger control valve.
To remove the connector, place the forefinger on the connector release with the thumb on the connector while pressing the release mechanism with the forefinger as shown.
Push in on the release mechanism and pull firmly on the connector for removal as shown.
Wear appropriate eye and face protection when using compressed air. Flying debris and dirt can cause personal injury.
It is normal for a small amount of air to be heard escaping from the turbocharger control valve. Do not replace the turbocharger control valve for this condition.
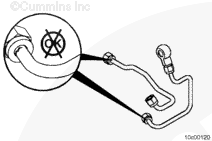
Check the air lines for cracks. Replace air lines if cracks are found.
Do not use any type of thread sealant or thread tape on air lines. The sealant can cause contamination or malfunction of the turbocharger control valve.
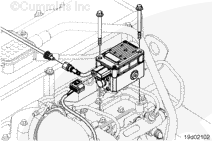
Install the two mounting capscrews.
Torque Value: 24 n.m [18 ft-lb]
Connect the electrical harness to the turbocharger control valve.
Install the air line from the turbocharger actuator to the turbocharger control valve using new sealing washers.
Torque Value: 18 n.m [160 in-lb]
Install the OEM air supply line to the turbocharger control valve.
Start and operate the engine. Verify proper operation.
Hello, I'm Jack, a diesel engine fan and a blogger. I write about how to fix and improve diesel engines, from cars to trucks to generators. I also review the newest models and innovations in the diesel market. If you are interested in learning more about diesel engines, check out my blog and leave your feedback.
View all posts by Jack

 WARNING
 CAUTION

;)
;)
;)
;)
;)
;)