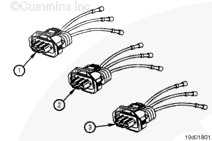
Install the pin repair wires and connector onto the bare wires of the harness and use the wire crimping tool to crimp each repair wire onto the harness.
Use heat gun, Part Number 3822860, to shrink the tubing. The tubing will shrink and make the connection waterproof.
Hello, I'm Jack, a diesel engine fan and a blogger. I write about how to fix and improve diesel engines, from cars to trucks to generators. I also review the newest models and innovations in the diesel market. If you are interested in learning more about diesel engines, check out my blog and leave your feedback.
View all posts by Jack


;)
;)
;)
;)
;)
;)
;)
;)
;)
;)
;)
;)