When using a steam cleaner, wear safety glasses or a face shield, as well as protective clothing. Hot steam can cause serious personal injury.
WARNING
Wear appropriate eye and face protection when using compressed air. Flying debris and dirt can cause personal injury.
CAUTION
Do not use the air bleed line as a handle or step. Doing this may result in cracks or damaged air bleed line that will cause fuel leaks. Make sure that steam does not spray directly on the electrical connections on the top of the accumulator block or fault codes will possibly occur.
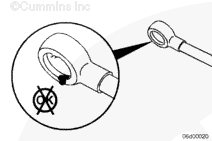
To reduce the possibility of an air bleed line leak due to a broken air bleed line, use two wrenches during removal and installation. Failure to do so may result in a cracked fuel line. In certain applications, with the fuel tank above the head of the engine, this will result in fuel draining from the fuel tank.
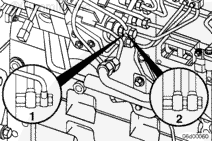
NOTE: There are three styles of air bleed lines. Identify your style and use the appropriate procedures that follow.
Style One (1):
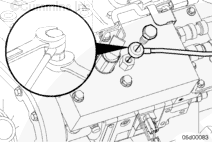
Remove the banjo capscrew at the injection control valve drain fitting of the fuel pump. Use two wrenches to prevent the line from being bent.
Style Two (2):
Remove the banjo capscrew at the injection control valve drain fitting of the fuel pump. Remove the hollow banjo fitting holding the air bleed line. Use two wrenches to prevent the line from being bent.
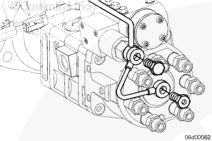
Remove the banjo capscrew at the air bleed fitting on top of the fuel pump. It is located on the accumulator module next to the two pumping control valves.
Use two wrenches to prevent the air bleed fitting from turning.
Remove the banjo capscrew at the air bleed fitting on top of the fuel pump. It is located on the accumulator module next to the two pumping control valves.
Use two wrenches to prevent the air bleed fitting from turning.
To reduce the possibility of an air bleed line leak due to a broken air bleed line, use two wrenches during removal and installation. Failure to do so may result in a cracked fuel line. In certain applications, with the fuel tank above the head of the engine, this will result in fuel draining from the fuel tank.
Install the banjo capscrew at the air bleed fitting on top of the fuel pump. Use two wrenches to prevent the line from being bent.
Install the banjo capscrew drain fitting on the fuel pump at the injection control valve. Use two wrenches to prevent the line from being bent.
Torque Value: 8 n.m [70 in-lb]
NOTE: Use new sealing washers.
Style Two (2):
Install the hollow banjo fitting at the injection control valve drain fitting to secure the air bleed line. Use two wrenches to prevent the line from being bent.
Torque Value: 24 n.m [18 ft-lb]
Install banjo capscrew. Use two wrenches to prevent the line from being bent.
Hello, I'm Jack, a diesel engine fan and a blogger. I write about how to fix and improve diesel engines, from cars to trucks to generators. I also review the newest models and innovations in the diesel market. If you are interested in learning more about diesel engines, check out my blog and leave your feedback.
View all posts by Jack
 WARNING
  CAUTION


;)
;)
;)
;)
;)
;)
;)
;)
;)
;)