NOTE: “LDL TFE” (Lay-Down Lip, Teflon™) oil seals for service replacement have an assembly tool which protects the seal lip during shipment and installation. The “LDL TFE” oil seal
must be installed with the lip of the seal and the crankshaft clean and dry. Do not use any lubricant. The use of lubricant will result in oil leakage at the seal.
The installation procedure for the crankshaft oil seal varies when used with or without a wear sleeve.
A seal without a wear sleeve may be used on new crankshafts, or used crankshafts having wear grooves less than 0.005″ deep.
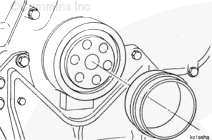
Use the installation sleeve provided with the seal to install the seal partially onto the crankshaft.
After installing the oil seal onto the installation sleeve, fit the sleeve over the nose of the crankshaft. Use hand pressure to transfer the oil seal over the installation sleeve onto the crankshaft as far as possible.
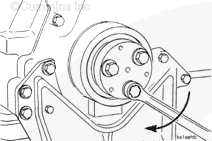
Remove the installation sleeve from the nose of the crankshaft.
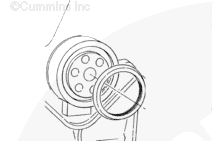
Install the included 3/16 inch spacer ring, Part Number 4919687, onto the top plate, Part Number ST-1259-1, with the three allen head screws, Part Number ST-1259-3, provided.
Install the top plate, Part Number ST-1259, (with a 3/16 inch spacer mounted) to the crankshaft, using three vibration damper mounting capscrews and flat washers.
Tighten the three capscrews alternately in 1/2-turn increments until the oil seal is installed flush with the gear cover bore.
Install the included 3/16 spacer, Part Number 4919687, onto the top plate, Part Number ST-1259-1. Use the three allen head screws provided, Part Number ST-1259-3.
Install the wear sleeve onto the seal using the plastic guide that is provided in the seal kit.
Apply a thin layer of sealant, such as Dow™ 736 or equivalent, to the wear sleeve and to the crankshaft where the wear sleeve will seat.
Fit the top plate (with spacer) and the seal (with wear sleeve) to the crankshaft using three included capscrews, Part Number S-123-A, and flat washers.
NOTE: Make sure the wear sleeve and seal are even before starting installation or damage to the wear sleeve can occur.
Tighten the three capscrews alternately in half turn increments until the oil seal is installed flush with the gear cover bore.
Clean any excess sealant from the crankshaft and seal.
Hello, I'm Jack, a diesel engine fan and a blogger. I write about how to fix and improve diesel engines, from cars to trucks to generators. I also review the newest models and innovations in the diesel market. If you are interested in learning more about diesel engines, check out my blog and leave your feedback.
View all posts by Jack


;)
;)
;)
;)
;)
;)
;)
;)