|
Engine Coolant Level Low – Critical
|

Overview
Engine Coolant Level Low – Critical
| CODE | REASON | EFFECT |
| Fault Code: 235 PID: P111 SPN: 111 FMI: 1 LAMP: Red SRT: |
Coolant level low – data valid but below normal operating range – most severe level. Low engine coolant level detected. |
Progressive power and speed derate; if engine protection shutdown is enabled, engine will shut down after 30 seconds of the lamp flashing. |
|
Engine Coolant Level Circuit (B Gas, B LPG Plus and C Gas Plus) |
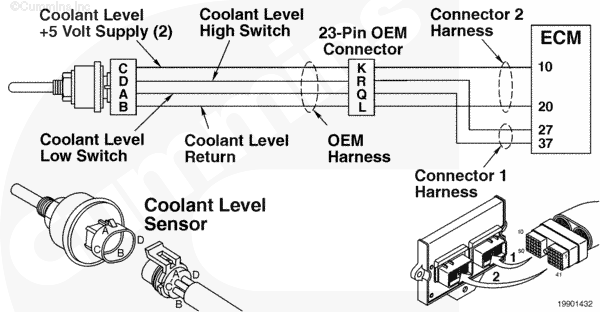 |
Circuit Description
There are two coolant signal level wires, one for high coolant level and one for low coolant level. The sensor is OEM-supplied.
Component Location
The coolant level sensor is usually located in the coolant supply tank. Refer to the OEM manual for the component location.
Shop Talk
The engine protection for coolant level is a customer feature and will
only be enabled at the customer’s request. This sensor
must deactivate or disable the fuel control valve if this feature is utilized by the OEM.
A coolant level sensor or shorting plug is required on all Gas Plus engines.
Cautions and Warnings
 WARNING WARNING Do not remove the pressure cap from a hot engine. Wait until the coolant temperature is below 50°C [120°F] before removing the pressure cap. Heated coolant spray or steam can cause personal injury.
|
 CAUTION CAUTION To reduce the possibility of damaging a new ECM, all other active fault codes must be investigated prior to replacing the ECM. |
|
CAUTION To reduce the possibility of pin and harness damage, use the following test lead when taking a measurement: |
Troubleshooting Steps
| STEPS | SPECIFICATIONS | |
|---|---|---|
| STEP 1. | Check the fault codes. | |
| STEP 1A. Read the fault codes. | Fault Code 235 active? | |
| STEP 2. | Check the coolant level. | |
| STEP 2A. Verify the coolant level. | Coolant level normal? | |
| STEP 3. | Check the coolant level sensor and harness. | |
| STEP 3A. Inspect the engine harness and coolant level sensor connector pins. | No damaged pins? | |
| STEP 3B. Read the fault codes. | Fault Code 235 active? | |
| STEP 4. | Check the ECM and harness. | |
| STEP 4A. Inspect the engine harness and ECM connector pins | Dirty or damaged pins? | |
| STEP 4B. Read the fault codes. | Fault Code 235 active? | |
| STEP 4C. Check for an open circuit. | Less than 10 ohms? | |
| STEP 4D. Check for a short circuit from pin to pin. | More than 100k ohms? | |
| STEP 5. | Verify the coolant level. | |
| STEP 5A. Verify the coolant level with INSITE™ electronic service tool. | INSITE™ electronic service tool reading of coolant level correct? | |
| STEP 5B. Check the sensor supply voltage. | 4.5 to 5.5 VDC? | |
| STEP 6. | Clear the fault codes. | |
| STEP 6A. Disable the fault code. | Fault Code 235 inactive? | |
| STEP 6B. Clear the inactive fault codes. | All fault codes cleared? | |
Guided Step 1 – Check the fault codes.
| Guided Step 1A – Read the fault codes. | |
|---|---|
Conditions
ActionRead the fault codes. Use INSITE™ electronic service tool to read the fault codes. |
|
|
Fault Code 235 active? |
|
| YES | NO |
| No Repair | No Repair |
Guided Step 2 – Check the coolant level.
| Guided Step 2A – Verify the coolant level. | |
|---|---|
Conditions
ActionCheck the coolant level.
|
|
|
Coolant level normal? |
|
| YES | NO |
| No Repair |
Add coolant to the system.
Check for coolant leaks. Refer to Symptom Tree Coolant Loss T019 in the C8.3G, C Gas Plus, and L Gas Plus Troubleshooting and Repair Manual, Bulletin 3666206 or |
Guided Step 3 – Check the coolant level sensor and harness.
| Guided Step 3A – Inspect the engine harness and coolant level sensor connector pins. | |
|---|---|
Conditions
ActionInspect the engine harness and coolant level sensor connector pins for the following:
Refer to the circuit diagram or wiring diagram for component pin identification. |
|
|
Dirty or damaged pins? |
|
| YES | NO |
|
Repair or replace the engine harness, or replace the sensor, whichever has the damaged pins.
|
No Repair |
| Guided Step 3B – Read the fault codes. | |
|---|---|
Conditions
ActionRead the fault codes.
|
|
|
Fault Code 235 active? |
|
| YES | NO |
| No Repair | No Repair |
Guided Step 4 – Check the ECM and Harness.
| Guided Step 4A – Inspect the engine harness and ECM connector pins. | |
|---|---|
Conditions
ActionInspect the engine harness and ECM connector pins for the following:
Refer to the circuit diagram or wiring diagram for component pin identification. |
|
|
Dirty or damaged pins? |
|
| YES | NO |
|
Repair or replace the engine harness, or replace the ECM, whichever has the damaged pins.
|
No Repair |
| Guided Step 4B – Read the fault codes. | |
|---|---|
Conditions
ActionRead the fault codes.
|
|
|
Fault Code 235 active? |
|
| YES | NO |
| No Repair | No Repair |
| Guided Step 4C – Check for an open circuit. | |
|---|---|
Conditions
ActionCheck for an open circuit.
|
|
|
Less than 10 ohms? |
|
| YES | NO |
| No Repair |
Repair or replace the engine harness or OEM harness.
|
| Guided Step 4D – Check for a short circuit from pin to pin. | ||
|---|---|---|
Conditions
ActionCheck for a short circuit from pin to pin.
|
|
|
|
More than 100k ohms? |
||
| YES | NO | |
| No Repair |
Repair or replace the engine harness or OEM harness.
|
|
;)
;)
;)
;)
Guided Step 5 –
| Guided Step 5A – Verify the coolant level with INSITE™ electronic service tool. | |
|---|---|
Conditions
ActionUse INSITE™ electronic service tool to verify the coolant level. Verify the Engine Coolant Level Sensor high reading is “ON” with INSITE™ electronic service tool and the Engine Coolant Level Sensor low reading is “OFF”. |
|
|
INSITE™ electronic service tool reading of coolant level correct? |
|
| YES | NO |
| No Repair |
Replace the sensor. Refer to the OEM service manual. |
| Guided Step 5B – Check the sensor supply voltage. | |
|---|---|
Conditions
ActionCheck the sensor supply voltage.
|
|
|
4.5 to 5.5- VDC? |
|
| YES | NO |
|
|
Guided Step 6 – Clear the fault codes.
| Guided Step 6A – Disable the fault code. | |
|---|---|
Conditions
ActionDisable the fault code.
|
|
|
Fault Code 235 inactive? |
|
| YES | NO |
| No Repair |
Troubleshooting procedures need to be completed again from the beginning. |
| Guided Step 6B – Clear the inactive fault codes. | |
|---|---|
Conditions
ActionClear the inactive fault codes.
|
|
|
All fault codes cleared? |
|
| YES | NO |
| No Repair |
Troubleshoot any remaining active fault codes. |
|
Repair complete
|
Appropriate troubleshooting charts
|