This component weighs 23kg [50lb] or more. To reduce the possibility of personal injury, use a hoist or get assistance to lift this component.
Disconnect the driveline and remove the transmission and clutch. Refer to the manufacturer’s instructions.
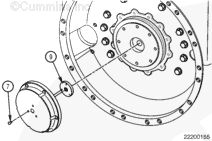
Remove the flywheel. if equipped.
For L10 engines, refer to Procedure 7-32 in the Troubleshooting and Repair Manual L10 COMMAND STC and CELECT™ Models, Bulletin 3810439.
For M11 engines, refer to Procedure 016-005 in the Troubleshooting and Repair M11 Series Engines (STC, CELECT™, CELECT™ Plus Models), Manual, Bulletin 3666139.
For L10G engines, refer to Procedure 016-005 in the Troubleshooting and Repair L10 (Natural Gas) Engines, Manual, Bulletin 3666207.
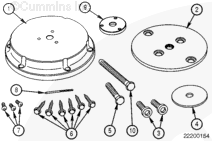
Lubricate the threads and tip of the remover screw with Lubriplate™ multi-purpose lubricant, Part Number 3163086, Part Number 3163087, or a suitable grease.
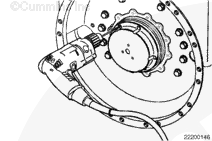
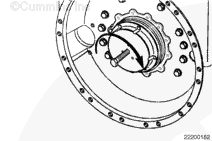
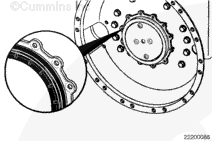
Install and turn the remover screw clockwise until the rear crankshaft oil seal is removed.
When using solvents, acids, or alkaline materials for cleaning, follow the manufacturer’s recommendations for use. Wear goggles and protective clothing to avoid personal injury.
WARNING
Some solvents are flammable and toxic. Read the manufacturer’s instructions before using.
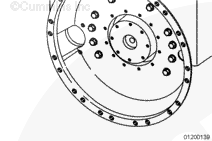
Clean and inspect the crankshaft sealing surface area and flywheel housing sealing surface. Use a crocus cloth to remove any rust or deposits on the crankshaft sealing surface.
Use a lint-free cloth to remove oil from the crankshaft sealing surface and flywheel housing sealing surface.
Check the crankshaft sealing surface and flywheel housing sealing surface for nicks, burrs, or grooves.
If nicks, burrs, or grooves are present, refer to the Alternative Repair Manual, L10 and M11 Series Engines, Bulletin 3810310.
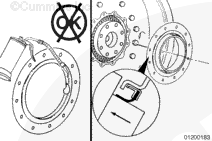
Do not separate the two parts of the oil seal assembly.
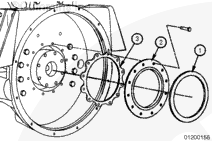
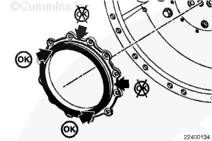
Make certain the raised section of the rear crankshaft oil seal capscrew flange is facing outward, away from the flywheel housing, and the gray rubber sealing bead is facing toward the flywheel housing, as illustrated.
Make certain that the remover screw adapter is removed before the installation process.
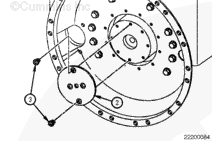
Lubricate the threads of the installer screw (5) with Lubriplate™ multi-purpose lubricant, Part Number 3163086, Part Number 3163087, or a suitable grease.
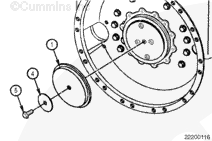
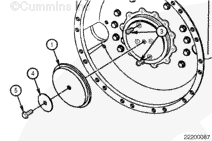
Position the installer plate (1) onto the rear crankshaft oil seal and the crankshaft seal guide.
Install the installer screw (5) through the washer (4) and the installer plate (1). Turn the installer screw clockwise until the installer plate (1) positions the rear crankshaft oil seal against the flywheel housing. Tighten the installer screw.
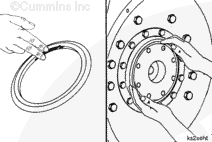
Place a light film of oil or antifreeze on the inside diameter of the dust seal.
Install the dust seal on the crankshaft gear with the larger outside diameter facing toward the engine. Push the dust seal back by hand on the crankshaft gear until the entire dust seal contacts the oil seal case.
This component weighs 23kg [50lb] or more. To reduce the possibility of personal injury, use a hoist or get assistance to lift this component.
Install the flywheel, if equipped.
For L10 engines, refer to Procedure 7-32 in the Troubleshooting and Repair Manual L10 COMMAND STC and CELECT™ Models, Bulletin 3810439.
For M11 engines, refer to Procedure 016-005 in the Troubleshooting and Repair M11 Series Engines (STC, CELECT™, CELECT™ Plus Models), Manual, Bulletin 3666139.
For L10G engines, refer to Procedure 016-005 in the Troubleshooting and Repair L10 (Natural Gas) Engines, Manual, Bulletin 3666207.
Install the clutch, transmission, and driveline. Refer to the manufacturer’s instructions.
Hello, I'm Jack, a diesel engine fan and a blogger. I write about how to fix and improve diesel engines, from cars to trucks to generators. I also review the newest models and innovations in the diesel market. If you are interested in learning more about diesel engines, check out my blog and leave your feedback.
View all posts by Jack
 WARNING


;)
;)
;)
;)
;)
;)
;)
;)
;)
;)
;)
;)
;)
;)
;)
;)
;)
;)
;)
;)
;)
;)
;)
;)
;)
;)
;)
;)
;)
;)