Do not use solvent to clean the rocker lever cover gasket. Solvent will damage the gasket material and cause it to swell. Prolonged exposure can also cause degradation of the gasket material.
Clean the reusable gasket with a dry, lint-free cloth, making sure no oil remains between the sealing beads.
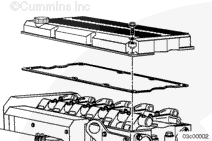
NOTE: Engines built before September 7, 2006, have the separate rocker lever cover and a separate cover gasket, make certain that no lubricating oil remains between the sealing beads.
NOTE: Engines built after September 7, 2006, or engines that have the cover gasket embedded in the rocker lever cover.
If the cover gasket was removed, install the cover gasket as soon as possible to avoid swelling of the cover gasket as the cover gasket swells due to its prior exposure to lubricating oil.
If a new cover gasket is required, use P80 lubriplate™, Part Number 3163086, or soapy water to lubricate the cover gasket.
If the cover gasket was removed or requires replacement, start the installation of the cover gasket at each bolt hole and press the cover gasket into the groove in the rocker level cover around each bolt hole.
After the cover gasket is in place around all bolt holes, press the cover gasket into the grove of the rocker level cover starting from the bolt holes moving to the center of each span.
Inspect and make certain that there are no kinks, twists or other damage.
Hello, I'm Jack, a diesel engine fan and a blogger. I write about how to fix and improve diesel engines, from cars to trucks to generators. I also review the newest models and innovations in the diesel market. If you are interested in learning more about diesel engines, check out my blog and leave your feedback.
View all posts by Jack


 WARNING
 CAUTION


;)
;)
;)
;)
;)
;)
;)
;)
;)
;)
;)
;)
;)
;)
;)
;)
;)
;)