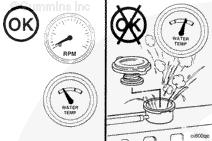
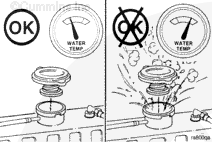
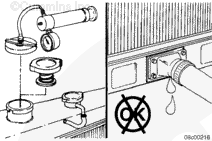
Do not remove the pressure cap from a hot engine. Wait until the coolant temperature is below 50°C [120°F] before removing the pressure cap. Heated coolant spray or steam can cause personal injury.
NOTE: Never use a sealing additive to stop leaks in the cooling system. This can result in coolant system plugging and inadequate coolant flow, causing the engine to overheat.
Do not add cold coolant to a hot engine. Engine castings can be damaged. Allow the engine to cool below 50°C [120°F] before adding coolant.
NOTE: In the event of a water pump or EGR cooler malfunction, check the coolant level switch or sensor for proper operation. Refer to the OEM service manual for operational checks and repairs.
On applications that use a coolant recovery system, check to make sure the coolant is at the appropriate level in the coolant recovery tank for the engine temperature.
Many coolant recovery/expansion tanks, also called “top tanks”, have sight glasses, or are made of a clear material (not shown) to aid in checking the coolant level without removing the radiator cap.
It is important to understand the impact of temperature on the expansion of the coolant. Most “top tanks” do not have a provision for a “FULL HOT” coolant level. Filling the “top tank” while hot will result in a low operating level once the system has cooled.
Do not remove the pressure cap from a hot engine. Wait until the coolant temperature is below 50°C [120°F] before removing the pressure cap. Heated coolant spray or steam can cause personal injury.
NOTE: If the coolant is being changed, or if the cooling system is being flushed, leave the coolant flow valves to the equipment heating systems open, in order to completely drain the system.
NOTE: Refer to the OEM service manual for special coolant drain requirements. Special instructions may also be located near the cooling system access point or fill door on the vehicle.
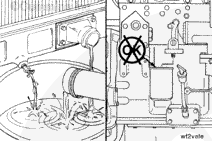
Isolate the engine from the vehicle cooling system by closing coolant flow valves to the equipment heating systems before starting the repair. This will prevent the heater circuit from draining, minimizing the chance for air pockets to be present during the fill process.
This air can be very difficult to purge in some applications that have several feet of plumbing and multiple heater cores.
Remove the radiator cap or expansion tank fill cap to allow the coolant to drain completely.
For industrial applications, use the Industrial and Power Generation QSX15 Engines Operation and Maintenance Manual, Bulletin 3666423. Refer to Procedure 018-004 in Section V.
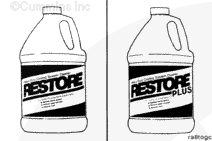
Restore™ is a heavy-duty cooling system cleaner that removes corrosion, silica gel, and other deposits. The performance of Restore™ is dependent on time, temperature, and concentration levels. An extremely scaled or flow-restricted system, for example, can require higher concentrations of cleaners, higher temperatures, longer cleaning times, or the use of Restore Plus™. Up to twice the recommended concentration levels of Restore™ can be used safely. Restore Plus™ must be used only at its recommended concentration level. Extremely scaled or fouled systems can require more than one cleaning.
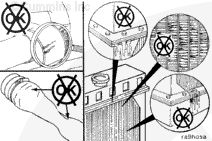
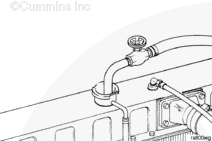
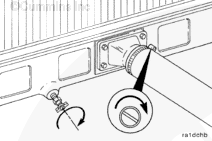
Opening the manual bleed valve or removing the pipe plug on applicable installations is critical. Failure to do so can result in engine damage.
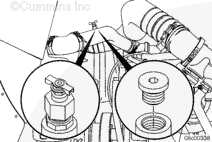
NOTE: Some applications can have a manual bleed valve or pipe plug that is required to be opened to properly fill the system. The upper radiator pipe is a common location.
NOTE: Some applications can have a pipe plug installed in place of the manual bleed valve.
If applicable, open the manual bleed valve or remove the pipe plug before filling the cooling system.
Fleetguard® Restore™ contains no antifreeze. Do not allow the cooling system to freeze during the cleaning operation.
CAUTION
The cooling system must be filled properly to prevent air locks or serious engine damage can result.
NOTE: The system has a designed fill rate of 19 liters [5 gal] per minute.
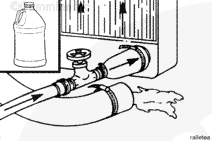
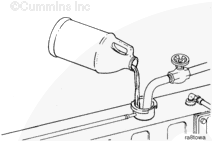
Add 3.8 liters [1 gal] of Fleetguard® Restore™, Restore Plus™, or equivalent, for each 38 to 57 liters [10 to 15 gal] of cooling system capacity, and fill the system with clean water.
Turn the cab heater temperature switch to high to allow maximum coolant flow through the heater core. The blower does not have to be on.
Do not remove the pressure cap from a hot engine. Wait until the coolant temperature is below 50°C [120°F] before removing the pressure cap. Heated coolant spray or steam can cause personal injury.
WARNING
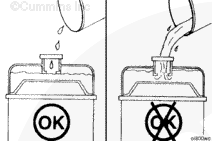
Coolant is toxic. Keep away from children and pets. If not reused, dispose of in accordance with local environmental regulations.
NOTE: All coolant shutoff valves should be returned to their open positions once the system has been refilled and the deaeration process is ready to begin. Refer to the OEM service manual for specific instructions.
Install the radiator cap or expansion tank fill cap.
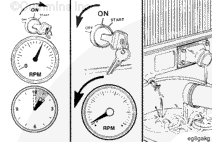
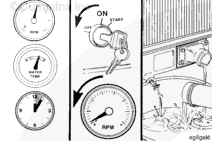
Operate the engine at HIGH IDLE and normal operating temperatures, at least 85°C [185°F], for one to one and a half hours.
Operate the engine at LOW IDLE for 2 minutes before shutting it down. This allows adequate cooling of pistons, cylinders, bearings, and turbocharger components.
Do not remove the pressure cap from a hot engine. Wait until the coolant temperature is below 50°C [120°F] before removing the pressure cap. Heated coolant spray or steam can cause personal injury.
WARNING
Coolant is toxic. Keep away from children and pets. If not reused, dispose of in accordance with local environmental regulations.
NOTE: All coolant shutoff valves should be returned to their open positions once the system has been refilled and the deaeration process is ready to begin. Refer to the OEM service manual for specific instructions.
Install the radiator cap or expansion tank fill cap.
Operate the engine at HIGH IDLE for 5 minutes with the coolant temperature above 85°C [185°F].
Operate the engine at LOW IDLE for 2 minutes before shutting it down. This allows adequate cooling of pistons, cylinders, bearings, and turbocharger components.
Shut the engine off and drain the cooling system.
If the water being drained is still dirty, the system must be flushed until the water is clean.
Restore™ is a heavy-duty cooling system cleaner that removes corrosion, silica gel, and other deposits. The performance of Restore™ is dependent on time, temperature, and concentration levels. An extremely scaled or flow-restricted system, for example, can require higher concentrations of cleaners, higher temperatures, longer cleaning times, or the use of Restore Plus™. Up to twice the recommended concentration levels of Restore™ can be used safely. Restore Plus™ must be used only at its recommended concentration level. Extremely scaled or fouled systems can require more than one cleaning.
Opening the manual bleed valve or removing the pipe plug on applicable installations is critical. Failure to do so can result in engine damage.
NOTE: Some applications can have a manual bleed valve or pipe plug that is required to be opened to properly fill the system. The upper radiator pipe is a common location.
NOTE: Some applications can have a pipe plug installed in place of the manual bleed valve.
If applicable, open the manual bleed valve or remove the pipe plug before filling the cooling system.
Fleetguard® Restore™ contains no antifreeze. Do not allow the cooling system to freeze during the cleaning operation.
CAUTION
The cooling system must be filled properly to prevent air locks or serious engine damage can result.
NOTE: The system has a designed fill rate of 19 liters [5 gal] per minute.
Add 3.8 liters [1 gal] of Fleetguard® Restore™, Restore Plus™, or equivalent, for each 38 to 57 liters [10 to 15 gal] of cooling system capacity, and fill the system with clean water.
Turn the cab heater temperature switch to high to allow maximum coolant flow through the heater core. The blower does not have to be on.
Fleetguard® Restore™ contains no antifreeze. Do not allow the cooling system to freeze during the cleaning operation.
CAUTION
The cooling system must be filled properly to prevent air locks or serious engine damage can result.
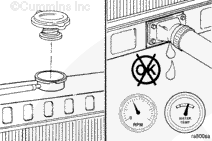
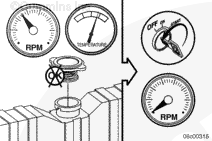
NOTE: Do not install the radiator cap or expansion tank fill cap. The engine is operated without the cap in this step.
NOTE: All coolant shutoff valves should be returned to their open positions once the system has been refilled and the deaeration process is ready to begin. Refer to the OEM service manual for specific instructions.
Wait 2 to 3 minutes without starting engine, to allow the system to deaerate and the fluid level to stabilize.
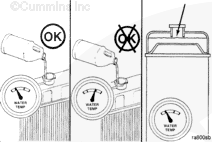
Add clean water to bring the level back to FULL COLD.
With the radiator cap or expansion tank fill cap off:
Operate the engine at LOW IDLE for 2 minutes.
Turn the engine off and add clean water to bring the level back to FULL COLD.
Do not remove the pressure cap from a hot engine. Wait until the coolant temperature is below 50°C [120°F] before removing the pressure cap. Heated coolant spray or steam can cause personal injury.
WARNING
Coolant is toxic. Keep away from children and pets. If not reused, dispose of in accordance with local environmental regulations.
Install the radiator cap or expansion tank fill cap.
Operate the engine at HIGH IDLE and normal operating temperatures, at least 85°C [185°F], for 1 to 1½ hours.
Operate the engine at LOW IDLE for 2 minutes before shutting it down. This allows adequate cooling of pistons, cylinders, bearings, and turbocharger components.
Opening the manual bleed valve or removing the pipe plug on applicable installations is critical. Failure to do so can result in engine damage.
NOTE: Some applications can have a manual bleed valve or pipe plug that is required to be opened to properly fill the system. The upper radiator pipe is a common location.
NOTE: Some applications can have a pipe plug installed in place of the manual bleed valve.
If applicable, open the manual bleed valve or remove the pipe plug before filling the cooling system.
Do not remove the pressure cap from a hot engine. Wait until the coolant temperature is below 50°C [120°F] before removing the pressure cap. Heated coolant spray or steam can cause personal injury.
WARNING
Coolant is toxic. Keep away from children and pets. If not reused, dispose of in accordance with local environmental regulations.
NOTE: All coolant shutoff valves should be returned to their open positions once the system has been refilled and the deaeration process is ready to begin. Refer to the OEM service manual for specific instructions.
Install the radiator cap or expansion tank fill cap.
Operate the engine at HIGH IDLE for 5 minutes with the coolant temperature above 85°C [185°F].
Operate the engine at LOW IDLE for 2 minutes before shutting it down. This allows adequate cooling of pistons, cylinders, bearings, and turbocharger components.
Shut the engine off and drain the cooling system.
If the water being drained is still dirty, the system must be repeatedly flushed until the water is clean.
Cummins Inc. recommends the use of either a 50/50 mixture of good-quality water and fully-formulated antifreeze, or fully-formulated coolant when filling the cooling system. The fully-formulated antifreeze or coolant must meet TMC RP329 or TMC RP330 specifications.
Good-quality water is important for cooling system performance. Excessive levels of calcium and magnesium contribute to scaling problems, and excessive levels of chlorides and sulfates cause cooling system corrosion.
Cummins Inc. recommends the use of Fleetguard® ES COMPLEAT™. It is available in glycol forms (ethylene and propylene) and complies with TMC RP329 and RP330 standards.
Opening the manual bleed valve or removing the pipe plug on applicable installations is critical. Failure to do so can result in engine damage.
NOTE: Some applications can have a manual bleed valve or pipe plug that is required to be opened to properly fill the system. The upper radiator pipe is a common location.
NOTE: Some applications can have a pipe plug installed in place of the manual bleed valve.
If applicable, open the manual bleed valve or remove the pipe plug before filling the cooling system.
NOTE: Refer to the OEM service manual for special coolant fill requirements. Special instructions may also be located near the cooling system access point or fill door on the vehicle.
NOTE: The system has a designed fill rate of 19 liters [5 gal] per minute.
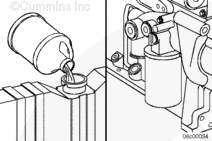
Fill the cooling system with heavy-duty coolant and install the correct service filter.
Identify the correct filter. For automotive applications, use the Signature™ and ISX Operation and Maintenance Manual, Bulletin 3666251.Refer to Procedure 018-004 in Section V.
For industrial applications, use the Industrial and Power Generation QSX15 Engines Operation and Maintenance Manual, Bulletin 3666423. Refer to Procedure 018-004 in Section V.
NOTE: All coolant shutoff valves should be returned to their open positions once the system has been refilled and the deaeration process is ready to begin. Refer to the OEM service manual for specific instructions.
Install the radiator cap or expansion tank fill cap.
Turn the cab heater temperature switch to high to allow maximum coolant flow through the heater core. The blower does not have to be on.
Operate the engine at HIGH IDLE until the thermostat opens, at least 93°C [200°F].
Operate the engine at LOW IDLE for 2 minutes before shutting it down. This allows adequate cool down of pistons, cylinders, bearings, and turbocharger components.
Do not remove the pressure cap from a hot engine. Wait until the coolant temperature is below 50°C [120°F] before removing the pressure cap. Heated coolant spray or steam can cause personal injury.
CAUTION
Do not add cold coolant to a hot engine. This can cause engine casting damage. Allow the engine to cool to below 50°C [120°F] before adding coolant.
NOTE: If all coolant drained from the system was collected, the same volume or more must go back into the system. If any drained coolant remains after filling, this is an indication of an air pocket which must be purged before returning the vehicle to service.
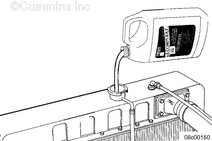
Remove the radiator or expansion tank fill cap and check the coolant level according to the OEM service manual.
Cummins Inc. recommends the use of either a 50/50 mixture of good-quality water and fully-formulated antifreeze, or fully-formulated coolant when filling the cooling system. The fully-formulated antifreeze or coolant must meet TMC RP329 or TMC RP330 specifications.
Good-quality water is important for cooling system performance. Excessive levels of calcium and magnesium contribute to scaling problems, and excessive levels of chlorides and sulfates cause cooling system corrosion.
Cummins Inc. recommends the use of Fleetguard® ES COMPLEAT™. It is available in glycol forms (ethylene and propylene) and complies with TMC RP329 and RP330 standards.
Opening the manual bleed valve or removing the pipe plug on applicable installations is critical. Failure to do so can result in engine damage.
NOTE: Some applications can have a manual bleed valve or pipe plug that is required to be opened to properly fill the system. The upper radiator pipe is a common location.
NOTE: Some applications can have a pipe plug installed in place of the manual bleed valve.
If applicable, open the manual bleed valve or remove the pipe plug before filling the cooling system.
NOTE: Refer to the OEM service manual for special coolant fill requirements. Special instructions may also be located near the cooling system access point or fill door on the vehicle.
NOTE: The system has a designed fill rate of 19 liters [5 gal] per minute.
Fill the cooling system with heavy-duty coolant and install the correct service filter.
Identify the correct filter. For automotive applications, use the Signature™ and ISX Operation and Maintenance Manual, Bulletin 3666251.Refer to Procedure 018-004 in Section V.
For industrial applications, use the Industrial and Power Generation QSX15 Engines Operation and Maintenance Manual, Bulletin 3666423. Refer to Procedure 018-004 in Section V.
Do not remove the pressure cap from a hot engine. Wait until the coolant temperature is below 50°C [120°F] before removing the pressure cap. Heated coolant spray or steam can cause personal injury.
WARNING
Coolant is toxic. Keep away from children and pets. If not reused, dispose of in accordance with local environmental regulations.
NOTE: All coolant shutoff valves should be returned to their open positions once the system has been refilled and the deaeration process is ready to begin. Refer to the OEM service manual for specific instructions.
Operate the engine at HIGH IDLE until the thermostat opens, at least 93°C [200°F].
Operate the engine at LOW IDLE for 2 minutes before shutting it down. This allows adequate cool down of pistons, cylinders, bearings, and turbocharger components.
Do not remove the pressure cap from a hot engine. Wait until the coolant temperature is below 50°C [120°F] before removing the pressure cap. Heated coolant spray or steam can cause personal injury.
CAUTION
Do not add cold coolant to a hot engine. This can cause engine casting damage. Allow the engine to cool to below 50°C [120°F] before adding coolant.
NOTE: If all coolant drained from the system was collected, the same volume or more must go back into the system. If any drained coolant remains after filling, this is an indication of an air pocket which must be purged before returning the vehicle to service.
Remove the radiator cap or expansion tank fill cap and check the coolant level according to the OEM service manual.
Add coolant if necessary. Do not overfill.
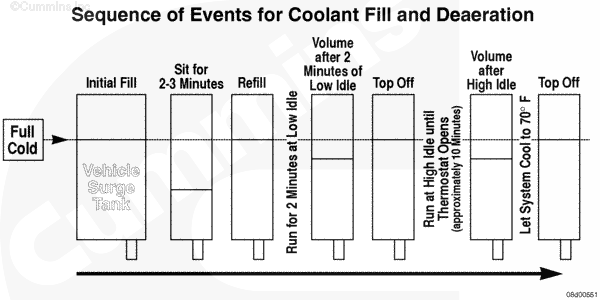
See Figure 1, illustrating the steps of the coolant fill and deaeration process.
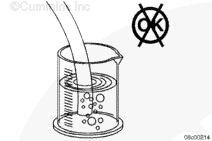
If the bubbles start at a lower pressure than the minimum recommended cap pressure (See Cooling System Specifications), inspect the radiator pressure cap. Refer to Procedure 008-047 in Section 8. Replace the radiator pressure cap, if necessary.
Hello, I'm Jack, a diesel engine fan and a blogger. I write about how to fix and improve diesel engines, from cars to trucks to generators. I also review the newest models and innovations in the diesel market. If you are interested in learning more about diesel engines, check out my blog and leave your feedback.
View all posts by Jack
 WARNING
 CAUTION
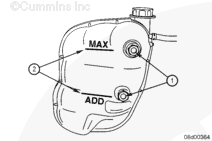


;)
;)
;)
;)
;)
;)
;)
;)
;)
;)
;)
;)
;)
;)
;)
;)
;)
;)
;)
;)
;)
;)
;)
;)
;)
;)
;)
;)
;)
;)
;)
;)
;)
;)
;)
;)
;)
;)
;)
;)
;)
;)
;)
;)
;)
;)
;)
;)
;)
;)
;)
;)