Remove
TOC
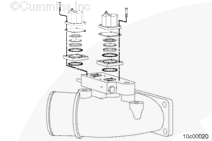
Use a 3/8-inch wrench to remove the nut holding the electrical connection of the four-step wastegate controller coil.
Remove the connection.
Remove the four capscrews.
Remove the coil and the fuel shield.
Remove the spring washer, valve disc, and actuator spacer from the valve housing.
Inspect for Reuse
TOC
Use mineral spirits. Clean all of the parts except the coil assembly.
NOTE : Do not get solvent on the coil. Clean the coil with a dry cloth. Use a 200-grit emery cloth and a flat surface to polish the coil surface.
Check the valve disc, valve seat, and actuator disc for dirt, metal parts, bonding separation, corrosion, cracks, or wear. Replace if necessary.
Use a wire brush to clean any corrosion from the coil terminal.
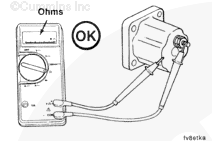
Check the coil assembly with a multimeter.
Replace the coil if not within specifications.
NOTE : If the coil assembly shows 0 ohm, there is an electrical short in the coil.
Tighten the nut that holds the electrical connection post on the coil.
Torque Value: 3 n.m [25 in-lb]
Resistance
12-VDC 6 to 10 ohms
24-VDC 24 to 40 ohms
Install
TOC
Assemble the valve as shown.
Install these parts as follows:
Install a new o-ring between the spacer and the control valve body.
Install the spacer o-ring groove toward the coil.
Install the spring washer with the cup side toward the coil.
Install the electrical connection on the coil.
Install the nut on the threaded post of the coil.
Use two wrenches to hold the post of the nut firmly while tightening the connection nut.
Torque Value: 3 n.m [25 in-lb]
Last Modified: 13-Mar-2002
Published by Jack
Hello, I'm Jack, a diesel engine fan and a blogger. I write about how to fix and improve diesel engines, from cars to trucks to generators. I also review the newest models and innovations in the diesel market. If you are interested in learning more about diesel engines, check out my blog and leave your feedback.
View all posts by Jack





;)
;)
;)
;)
;)
;)
