ISM, ISMe, and QSM11 – 010-109   Turbocharger Wastegate Controller

Remove

TOC

Remove the electrical leads of each coil of the wastegate controller.

Remove the wastegate actuator hose from the wastegate controller.

Remove the wastegate controller capscrews.

SMALL | MEDIUM | LARGE

Disassemble

TOC

Remove the rectangular ring seal from the intake manifold inlet of the wastegate controller.

Remove the four capscrews for the coil.

Remove the coil and shutoff valve shield.

Remove the valve spring, valve disc, and rectangular ring seal from the controller housing.

SMALL | MEDIUM | LARGE
   

Inspect for Reuse

TOC

 CAUTION 

Controller orifices can not be removed from the controller housing. Attempting to remove orifices can result in damage to the housing or orifice.

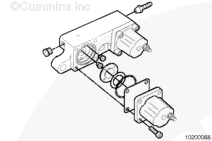
Check for plugged orifices in the controller housing. All of the parts except the coil assembly can be cleaned using mineral spirits.

NOTE: Do not get solvent on the coil. Clean the coil with a dry cloth. Use a 200 grit emery cloth and a flat surface to polish the coil surface.

A wire brush can only be used on the coil terminal.

Visually check the valve disc, valve spring, and shutoff valve shield for dirt, metal parts, bonding separation, corrosion, cracks, or wear. Replace if necessary.

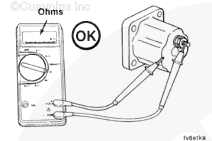
Use a wire brush to clean any corrosion from the coil terminal.

SMALL | MEDIUM | LARGE


Check the coil assembly with a multimeter.

Replace the coil if not within specifications.

If the coil assembly shows zero ohms, there is an electrical short in the coil.

Solenoid
Ohms
C° [F°]
24 VDC
26-40
-18 to 100 [0 to 212]
12 VDC
6-10
-18 to 100 [0 to 212]

Tighten the nut that holds the electrical connection post on the coil.

Torque Value:  1.695  n.m  [15 in-lb]

SMALL | MEDIUM | LARGE
   

Assemble

TOC

Assemble the valve as shown.

Install these parts as follows:

  • Install a new rectangular ring seal in the controller housing.
  • Install the valve disk with the rubber bulls-eye side down
  • Install the valve spring on the valve disc with the cavity side positioned upward.

SMALL | MEDIUM | LARGE


The coil must be orientated with the electrical connection post at the three o’clock position, when the controller is installed on the engine.

Make sure the coil is the correct voltage. The coil voltage and part number are cast into the terminal connection end of the coil.

  • Install the shutoff shield and coil on the control valve body.
  • Tighten the capscrews.
Torque Value:  8  n.m  [72 in-lb]

SMALL | MEDIUM | LARGE
   

Install

TOC

  • Install a new rectangular ring seal around the intake manifold connection of the wastegate controller.
  • Place the wastegate controller on the intake manifold and tighten the capscrews.
Torque Value:  47  n.m  [35 ft-lb]
  • Refit the wastegate actuator hose to the wastegate controller.
  • Install the electrical connections on the coils.
  • Install the nut on the threaded post of the coils.
  • Use two wrenches to hold the post of the nut firmly while tightening the connection nut.
Torque Value:  1.695  n.m  [15 in-lb]

SMALL | MEDIUM | LARGE
Last Modified:  23-Jan-2009