A small amount of air could possibly be heard escaping from the turbocharger control valve during the turbocharger actuator test. This is a normal condition for the valve to achieve output regulation pressure.
Do not replace the turbocharger control valve for this condition.
The valve should not leak air with key on and engine off. If the valve leaks air with key on and engine off, the valve is damaged.
Do not pull on the wiring harness. Damage to the harness will result.
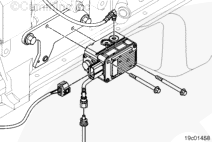
Disconnect the electrical harness from the turbocharger control valve.
To remove the connector, place the forefinger on the connector release with the thumb on the connector, while pressing the release mechanism with the forefinger as shown.
Push in on the release mechanism and pull firmly on the connector for removal, as shown.
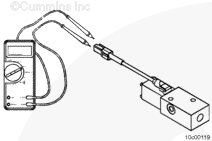
Check the resistance of the turbocharger control valve solenoid.
The resistance must be 5 to 9 ohms.
Check the thread holes for damaged threads, contamination, and water entrapment. Clean the thread holes if contamination or water entrapment is evident. Replace the control valve if the solenoid resistance does not meet the specification.
NOTE: If the turbocharger control valve is replaced, replace the turbocharger air shutoff valve filter.
Wear appropriate eye and face protection when using compressed air. Flying debris and dirt can cause personal injury.
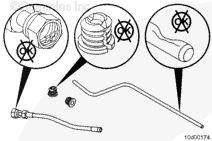
Check the air lines for cracks. Replace the air lines if cracks are found.
Check the air lines for contamination or water. Use compressed air to clean the air lines.
Check the control valve for water contamination. If water is evident, the control valve should be cycled to purge the water and to verify proper operation. Use the Turbocharger Actuator Test in the INSITE™ electronic service tool to cycle the control valve by extending and retracting the turbocharger actuator at least 10 times.
Do not use any type of thread sealant or thread tape on air lines. The sealant can cause contamination or malfunction of the turbocharger control valve.
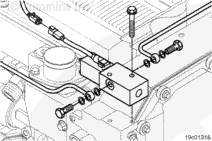
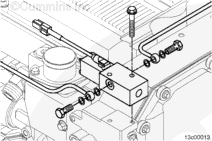
Install the two mounting capscrews.
Torque Value: 26 n.m [221 in-lb]
Connect the electrical harness to the turbocharger control valve.
Install the air line from the turbocharger actuator to the turbocharger control valve. Use new sealing washers.
Torque Value: 14 n.m [124 in-lb]
Install the air supply line to the turbocharger control valve. Use new sealing washers.
Torque Value: 35 n.m [26 ft-lb]
Start and operate the engine. Verify proper operation.
Do not use any type of thread sealant or thread tape on air lines. The sealant can cause contamination or malfunction of the turbocharger control valve.
Polymer Body Fittings
8 to 9 n.m
[71 to 80 in-lb]
Aluminum Body Fittings
15 n.m
[133 in-lb]
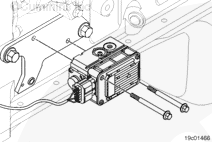
Install the two turbocharger control valve mounting capscrews.
Torque Value: 15 n.m [133 in-lb]
NOTE: If the turbocharger control valve bracket was removed, install the bracket and tighten the mounting capscrews.
Torque Value: 80 n.m [59 ft-lb]
Connect the electrical harness to the turbocharger control valve.
Install the air line from the turbocharger actuator to the turbocharger control valve.
Torque Value: 16 n.m [142 in-lb]
Install the OEM air supply line to the turbocharger control valve.
Hello, I'm Jack, a diesel engine fan and a blogger. I write about how to fix and improve diesel engines, from cars to trucks to generators. I also review the newest models and innovations in the diesel market. If you are interested in learning more about diesel engines, check out my blog and leave your feedback.
View all posts by Jack


 CAUTION
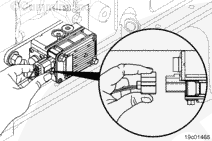


 WARNING
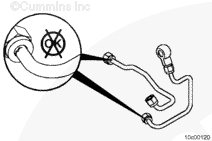


;)
;)
;)
;)
;)
;)
;)
;)
;)
;)
;)
;)
;)
;)
;)
;)
;)
;)