ISC, ISCe, QSC8.3, ISL, ISLe3, ISLe4 and QSL9 Engines – 008-053   Heat Exchanger

General Information

TOC

Marine Applications


This procedure applies to marine engines only.

The heat exchanger and the expansion tank is a one-piece component on the QSC8.3 marine engine.

The heat exchanger and expansion tank are separate components on the QSL9 marine engine.

 
SMALL | MEDIUM | LARGE

Preparatory Steps

TOC

QSL Engines


 WARNING 

Batteries can emit explosive gases. To reduce the possibility of personal injury, always ventilate the compartment before servicing the batteries. To reduce the possibility of arcing, remove the negative (-) battery cable first and attach the negative (-) battery cable last.
 WARNING 

Coolant is toxic. Keep away from children and pets. If not reused, dispose of in accordance with local environmental regulations.
 WARNING 

Do not remove the pressure cap from a hot engine. Wait until the coolant temperature is below 50°C [120°F] before removing the pressure cap. Heated coolant spray or steam can cause personal injury.
 CAUTION 

Use caution when draining the coolant. Do not spill coolant into the bilge area. Coolant must not be pumped overboard. The coolant must be disposed of in accordance with local environmental regulations.
  • Disconnect the batteries. Refer to Procedure 013-009.
  • Shut off the sea water valve. Refer to the OEM service manual.
  • Drain the engine coolant. Refer to Procedure 008-018.
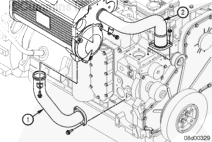
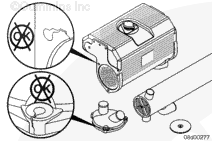
  • Disconnect the coolant make-up hose from the expansion tank to the coolant transfer tube. Refer to Procedure 008-052.
  • Drain the sea water system. Refer to Procedure 010-005.
 
SMALL | MEDIUM | LARGE
   

QSC Engines


 WARNING 

Batteries can emit explosive gases. To reduce the possibility of personal injury, always ventilate the compartment before servicing the batteries. To reduce the possibility of arcing, remove the negative (-) battery cable first and attach the negative (-) battery cable last.
 WARNING 

Coolant is toxic. Keep away from children and pets. If not reused, dispose of in accordance with local environmental regulations.
 WARNING 

Do not remove the pressure cap from a hot engine. Wait until the coolant temperature is below 50°C [120°F] before removing the pressure cap. Heated coolant spray or steam can cause personal injury.
 CAUTION 

Use caution when draining the coolant. Do not spill coolant into the bilge area. Coolant must not be pumped overboard. The coolant must be disposed of in accordance with local environmental regulations.
  • Disconnect the batteries. Refer to Procedure 013-009.
  • Shut off the sea water valve. Refer to the OEM service manual.
  • Drain the engine coolant. Refer to Procedure 008-018.
  • Drain the sea water system. Refer to Procedure 010-005.
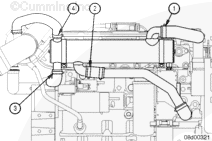
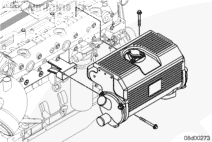
  • Disconnect the vent lines from the turbocharger, exhaust manifold, and cylinder head. Refer to Procedure 008-017.
 
SMALL | MEDIUM | LARGE
   

Remove

TOC

QSL Engines


Disconnect the engine coolant heat exchanger inlet hose (1).

Disconnect the engine coolant heat exchanger outlet hose (2).

Disconnect the sea water coolant heat exchanger inlet hose (3).

Disconnect the sea water coolant heat exchanger outlet hose (4).

SMALL | MEDIUM | LARGE


Remove the four mounting capscrews, retaining clamps and isolators, and the heat exchanger.

SMALL | MEDIUM | LARGE
   

QSC Engines


Remove the engine coolant water inlet (1) and outlet (2) tubes from the heat exchanger.

 
SMALL | MEDIUM | LARGE


Disconnect and remove the sea water inlet (1) from the heat exchanger and the aftercooler.

Remove the outlet hose (2) from the heat exchanger.

SMALL | MEDIUM | LARGE


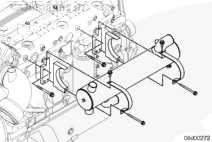
Remove the two mounting capscrews at the bottom of the heat exchanger and the four mounting capscrews at the heat exchanger to exhaust manifold mounting.

Remove the heat exchanger.

SMALL | MEDIUM | LARGE
   

Disassemble

TOC

QSL Engines


Remove the two end caps from the heat exchanger.

SMALL | MEDIUM | LARGE
   

QSC Engines


Note the orientation of the zinc plug locations so they are installed in the same location.

Remove the two end caps from the heat exchanger.

SMALL | MEDIUM | LARGE
   

Clean and Inspect for Reuse

TOC

 WARNING 

Wear appropriate eye and face protection when using compressed air. Flying debris and dirt can cause personal injury.

NOTE: The heat exchanger core can be cleaned and leak tested by a radiator cleaning facility. Ultrasonic cleaner is the preferred method of cleaning.

Clean the end caps and the housing with soap and water.

Dry with compressed air.

SMALL | MEDIUM | LARGE


Inspect the housing and caps for cracks or other damage.

Inspect the housing for deterioration of the sealing surfaces.

SMALL | MEDIUM | LARGE
   

Assemble

TOC

QSL Engines


Install a new gasket, seal, spacer and washer.

Install and tighten the end cap mounting capscrews.

Torque Value:  43  n.m  [32 ft-lb]

SMALL | MEDIUM | LARGE
   

QSC Engines


Install new o-rings on both end caps.

Install the end caps with the zinc anodes orientated in the same location as they were removed. Tighten the capscrews.

Torque Value:  44  n.m  [32 ft-lb]

Install the zinc anodes.

Torque Value:  55  n.m  [41 ft-lb]

SMALL | MEDIUM | LARGE
   

Pressure Test

TOC

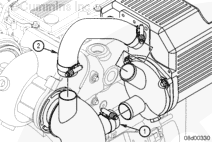
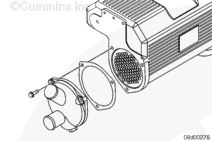
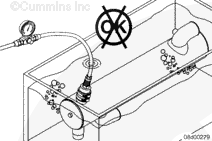
Fabricate a test fixture to seal the sea water connections, or use connector hoses with a quick disconnect air connection to supply a regulated test pressure of 276 kPa [40 psi] to the sea water side of the heat exchanger.

SMALL | MEDIUM | LARGE


 WARNING 

Wear appropriate eye and face protection when using compressed air. Flying debris and dirt can cause personal injury.

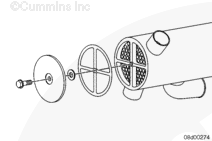
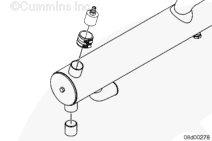
Submerge the expansion tank into a tank of water for one minute. Inspect for air leaks at the end caps and bubbles at the zinc anode plugs. If leaks are detected, replace the cooler.

Remove the cooler from the tank.

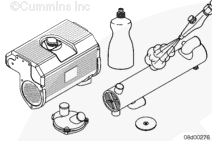
Shut off the air supply and disconnect the air supply.

Remove the test equipment and dry the cooler with compressed air.

SMALL | MEDIUM | LARGE
   

Install

TOC

QSL Engines


Install the coolant heat exchanger with the retaining clamps and four mounting capscrews.

Hand tighten the capscrews at this time.

SMALL | MEDIUM | LARGE


Connect the engine coolant heat exchanger inlet hose (1).

Connect the engine coolant heat exchanger outlet hose (2) to the heat exchanger and water pump inlet connection.

Connect the sea water coolant heat exchanger inlet hose (3).

Connect the sea water coolant heat exchanger outlet hose (4).

Tighten all the hose clamps.

Torque Value:  8  n.m  [71 in-lb]

Tighten the heat exchanger mounting capscrews.

Torque Value:  44  n.m  [32 ft-lb]

SMALL | MEDIUM | LARGE
   

QSC Engines


Install the heat exchanger to the exhaust manifold first with the four mounting capscrews. Do not tighten these capscrews at this time.

Install the two capscrews at the bottom of the heat exchanger. Tighten the capscrews.

Torque Value:  44  n.m  [32 ft-lb]

Tighten the four upper capscrews.

Torque Value:  44  n.m  [32 ft-lb]

SMALL | MEDIUM | LARGE


Connect the sea water inlet tube (1) to the heat exchanger and the aftercooler. Tighten the capscrews on the aftercooler connection.

Torque Value:  24  n.m  [18 ft-lb]

Connect the sea water outlet connection (2) to the heat exchanger and exhaust riser.

Tighten the host clamps. on the heat exchanger and exhaust riser.

Torque Value:  8  n.m  [71 in-lb]

SMALL | MEDIUM | LARGE


Use new o-rings and install the engine coolant heat exchanger inlet
(1) and outlet (2) tubes.

Tighten the capscrews.

Torque Value:  24  n.m  [18 ft-lb]

SMALL | MEDIUM | LARGE
   

Finishing Steps

TOC

QSL Engines


  • Connect the coolant make-up hose from the expansion tank to the coolant transfer tube. Refer to Procedure 008-052.
  • Fill the engine cooling system. Refer to Procedure 008-018.
  • Open the sea water valve. Refer to the OEM service manual.
  • Connect the batteries. Refer to Procedure 013-009.

Operate the engine and check for leaks.

 
SMALL | MEDIUM | LARGE
   

QSC Engines


  • Connect the vent lines from the turbocharger, exhaust manifold, and cylinder head. Refer to Procedure 008-017.
  • Fill the engine with coolant. Refer to Procedure 008-018.
  • Open the sea water valve. Refer to the OEM service manual.
  • Connect the batteries. Refer to Procedure 013-009.

Operate the engine and check for leaks.

 
SMALL | MEDIUM | LARGE
Last Modified:  22-Jul-2005