ISC, ISCe, QSC8.3, ISL, ISLe3, ISLe4 and QSL9 Engines – 012-003   Air Compressor Carbon Buildup

Table of Contents

Initial Check
 
Knorr-Bremse™
Clean

Initial Check

TOC

 WARNING 

Wear appropriate eye and face protection when using compressed air. Flying debris and dirt can cause bodily injury.

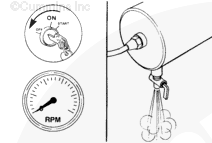
Shut the engine off.

Open the petcock on the wet tank to release the compressed air from the system.

 
SMALL | MEDIUM | LARGE


 WARNING 

Air discharge lines can be very hot. Be sure the lines are cool before handling to reduce the possibility of personal injury.

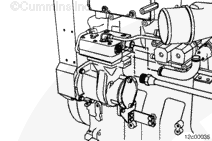
Remove the air inlet and outlet connections from the air compressor.

SMALL | MEDIUM | LARGE


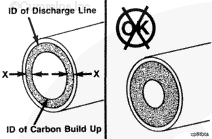
Measure the total carbon buildup thickness inside the air discharge line as shown.

NOTE: The carbon buildup thickness must not exceed 1.6 mm [0.06 in].

SMALL | MEDIUM | LARGE


 WARNING 

The air discharge line must be capable of withstanding extreme heat and pressure to prevent the possibility of personal injury and property damage. Refer to the OEM service manual.

NOTE: If the total carbon deposit thickness exceeds specification, remove and clean, or replace the air discharge line. Refer to the OEM service manual for the manufacturer’s specifications.

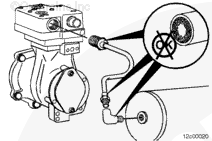
Continue to check for carbon buildup in the air discharge line connections up to the first connection or wet tank.

Clean or replace any lines and fittings with carbon buildup thicker than 1.6 mm [0.06 in]. Refer to the OEM service manual for cleaning or replacement instructions.

SMALL | MEDIUM | LARGE
   

Knorr-Bremse™


 WARNING 

The air discharge line and other equipment will become hot during the course of the test. To prevent burns, use protective gloves when touching heated surfaces.

Start the engine and run until the coolant temperature reaches the normal operating temperature. Once the coolant has reached operating temperature, deplete the air from the brake system and fully recharge it.

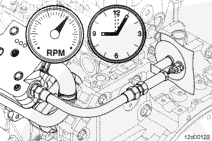
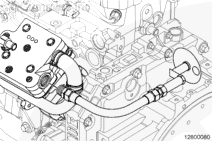
Stop the engine and disconnect the discharge pipe from the air compressor at a point where the test paper can be held.

Connect the test tool, Part Number 4918883, to the end of the air discharge pipe.

NOTE: It can make the test easier if the high temperature flexible hose (minimum 15 mm [0.6 in] inside diameter) is connected directly to the discharge port of the compressor, in order to carry out the test outside of the engine compartment. This will allow the test to be conducted outside of the engine compartment.

SMALL | MEDIUM | LARGE


 WARNING 

The discharge from the air compressor delivery will be hot, possibly contain oil vapors, and will be noisy. Be sure that there is adequate ventilation and that hearing protection is used, particularly if the type of vehicle requires that the test be conducted in an enclosed environment.

Run the engine at high idle, or 2100 rpm, for 10 minutes to stabilize the temperature.

NOTE: It can be necessary to use INSITE™ electronic service tool to increase the maximum engine speed, without VSS, to 2100 rpm.

Install the test paper into the service tool, Part Number 4918883, and be sure that it is held at right angles to and in line with the flow of compressed air, at a distance of 100 mm [3.9 in] from the end of the compressor discharge pipe, or flexible hose, if fitted.

The test paper can be standard clean copier paper, typically 80 grams/sq meter. It must be mounted in the air compressor discharge line tool, leaving a 70 mm [2.76 in] diameter circle of the paper exposed. The outline of the circle in the mask must be drawn onto the test paper to aid comparison later.

Start the engine and run it at high idle, or 2100 rpm. Leave the test paper in the airflow for exactly 5 minutes, then remove it.

Repeat the test until 3 comparable test results are obtained.

At the end of 5 minutes, remove the test paper and shut off the engine.

Compare the three test results.

NOTE: If the maximum engine speed, without VSS, was adjusted in the previous step, change it back to the original value upon completion of the test.

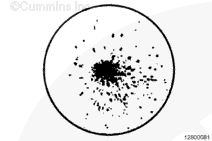
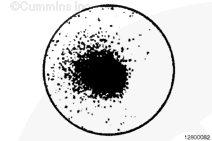
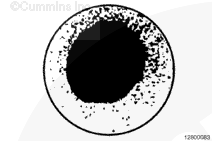
Compare the test results with the reference results shown below.

SMALL | MEDIUM | LARGE


Time air compressor has been in service in months

  • Less Than Six Months
  • Compressor in good condition
  • Six Months to Two Years
  • Compressor in good condition
  • More Than Two Years
  • Compressor in good condition
 
SMALL | MEDIUM | LARGE


Time air compressor has been in service in months

  • Less Than Six Months
  • Compressor needs to be replaced
  • Six Months to Two Years
  • Compressor in acceptable condition
  • More Than Two Years
  • Compressor in good condition
 
SMALL | MEDIUM | LARGE


Time air compressor has been in service in months

  • Less Than Six Months
  • Compressor needs to be replaced
  • Six Months to Two Years
  • Compressor needs to be replaced
  • More Than Two Years
  • Compressor needs to be replaced
 
SMALL | MEDIUM | LARGE
   

Clean

TOC

 WARNING 

Use skin and eye protection when handling caustic solutions to reduce the possibility of personal injury.
 WARNING 

Wear appropriate eye and face protection when using compressed air. Flying debris and dirt can cause personal injury.
 CAUTION 

Do not use a sharp object to remove carbon. The sealing surfaces can be damaged.
 CAUTION 

Avoid getting debris and solvents into the clearance between the piston and bore.
 CAUTION 

Avoid the use of abrasive products similar to “Scotch-Brite™” because any abrasive grit left after cleaning will shorten the life of your air compressor.

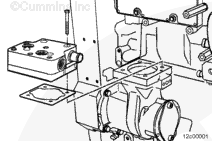
Remove the compressor head and valve assembly. Refer to Procedure 012-007 in Section 12.

SMALL | MEDIUM | LARGE


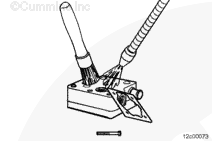
Clean the compressor head and valve assembly components with solvent and a nonmetallic brush to remove carbon.

Blow out passages with compressed air.

SMALL | MEDIUM | LARGE


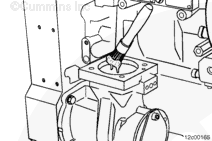
Clean the compressor cylinder.

Rotate the crankshaft until the piston is at the top of the cylinder bore.

Remove any accumulated carbon and varnish by carefully scraping and with light application of solvents.

SMALL | MEDIUM | LARGE


Install the compressor head and valve assembly. Refer to Procedure 012-007 in Section 12.

SMALL | MEDIUM | LARGE
Last Modified:  20-Jul-2010