Centinel System – Repair Manual – 009-056   Alternator/Refrigerant Compressor Mounting Bracket

Preparatory Steps

TOC

Automotive with CM870


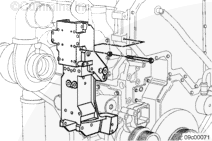
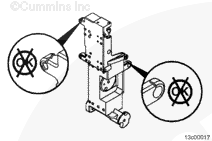
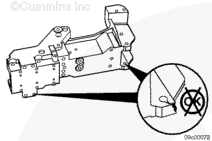
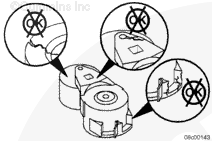
  • Remove the turbocharger control valve. Refer to Procedure 019-388 in the Troubleshooting and Repair Manual CM870 Electronic Control System Signature and ISX Engines, Bulletin 4021334.
  • Remove the alternator drive belt. Refer to Procedure 013-005.
  • Remove the alternator. Refer to Procedure 013-001.
  • Remove the alternator spacers. Refer to Procedure 013-036.
  • Remove the refrigerant compressor drive belt. Refer to Procedure 009-052.
  • Remove the refrigerant compressor. Refer to Procedure 009-051.
  • Remove the refrigerant compressor mounting bracket. Refer to Procedure 009-055.
  • Remove the refrigerant compressor belt tensioner. Refer to Procedure 009-053.
  • Remove the refrigerant idler pulley. Refer to Procedure 009-054.
  • Remove the water pump belt tensioner. Refer to Procedure 008-080.

SMALL | MEDIUM | LARGE

Automotive with CM570


  • Remove the refrigerant compressor and alternator belt. Refer to Procedure 013-005.
  • Remove the refrigerant compressor. Refer to the OEM service manual.
  • Remove the upper belt tensioner. Refer to Procedure 013-021.
  • Remove the lower belt tensioner. Refer to Procedure 008-080.

SMALL | MEDIUM | LARGE
   

Remove

TOC

Automotive with CM870


Disconnect the wire harness jumper from the EGR valve motor, EGR valve position sensor and the main engine wire harness.

Remove the five mounting capscrews from the alternator/refrigerant compressor mounting bracket.

Gently pry out the bracket from the gear housing.

The split washers will create a slight friction fit between the bracket and the gear housing.

Remove the wire harness jumper from the alternator/refrigerant compressor mounting bracket.

SMALL | MEDIUM | LARGE
   

Automotive with CM570


Remove the six mounting capscrews from the alternator/refrigerant compressor mounting bracket.

Gently pry out the bracket from the gear housing.

The split washers will create a slight friction between the bracket and the gear housing.

SMALL | MEDIUM | LARGE
   

Inspect for Reuse

TOC

Automotive with CM870


Inspect the alternator/refrigerant compressor mounting bracket for cracks.

Replace the bracket if necessary.

Inspect underneath the refrigerant compressor, alternator spacer, water pump belt tensioner, and refrigerant compressor belt tensioner for wear.

If wear is found, replace the alternator bracket.

SMALL | MEDIUM | LARGE
   

Automotive with CM570


Inspect the alternator/refrigerant compressor mounting bracket for cracks.

Replace the bracket if necessary.

SMALL | MEDIUM | LARGE


Inspect belt tensioners for excessive wear.

If worn excessively, replace the belt tensioners.

SMALL | MEDIUM | LARGE
   

Install

TOC

Automotive with CM870


Install the wire harness jumper to the alternator/refrigerant compressor mounting bracket.

Torque Value:  18  n.m  [14 ft-lb]

Tap the split washers out slightly. This will ease the installation.

Install the alternator/refrigerant compressor mounting bracket to the gear housing.

SMALL | MEDIUM | LARGE


Install the five mounting capscrews.

Tighten the capscrews in the sequence shown.

(1, 2 3 and 4) 36 n.m [27 ft-lb]
(5) 56 n.m [41 ft-lb]

SMALL | MEDIUM | LARGE
   

Automotive with CM570


The alternator/refrigerant compressor mounting bracket mounts to the gear housing at the top and the water pump at the bottom.

Install the bracket and six mounting capscrews.

Tighten the capscrew that threads into the gear housing.

Torque Value:  56  n.m  [41 ft-lb]

SMALL | MEDIUM | LARGE


Tighten the short capscrew (1).

Tighten the remaining capscrews (2, 3, 4, and 5).

(1, 2, 3, 4, and 5) 34 n.m [25 ft-lb]

SMALL | MEDIUM | LARGE
   

Finishing Steps

TOC

Automotive with CM870


  • Install the water pump belt tensioner. Refer to Procedure 008-080.
  • Install the refrigerant compressor idler pulley. Refer to Procedure 009-054.
  • Install the refrigerant compressor belt tensioner Refer to Procedure 009-053.
  • Install the refrigerant compressor mounting bracket. Refer to Procedure 009-055.
  • Install the refrigerant compressor. Refer to Procedure 009-051.
  • Install the refrigerant compressor drive belt. Refer to Procedure 009-052.
  • Install the alternator spacers. Refer to Procedure 013-036.
  • Install the alternator. Refer to Procedure 013-001.
  • Install the alternator drive belt. Refer to Procedure 013-005.
  • Install the turbocharger control valve. Refer to Procedure 019-388 in the Troubleshooting and Repair Manual CM870 Electronic Control System Signature and ISX Engines, Bulletin 4021334.

SMALL | MEDIUM | LARGE
   

Automotive with CM570


  • Install the upper belt tensioner. Refer to Procedure 013-021.
  • Installl the lower belt tensioner. Refer to Procedure 008-080.
  • Install the refrigerant compressor. Refer to the OEM service manual.
  • Install the refrigerant compressor and alternator drive belt. Refer to Procedure 013-005.

SMALL | MEDIUM | LARGE
Last Modified:  13-Jun-2005