|
Engine Cylinder Number 6 Knock – Data Valid but Above Normal Operational Range – Most Severe Level
|

Overview
| CODE | REASON | EFFECT |
| Fault Code: 566 PID: S095 SPN: 1357 FMI: 0 LAMP: Red SRT: |
Engine Cylinder Number 6 Knock – Data Valid but Above Normal Operational Range – Most Severe Level. |
Engine power derate. |
|
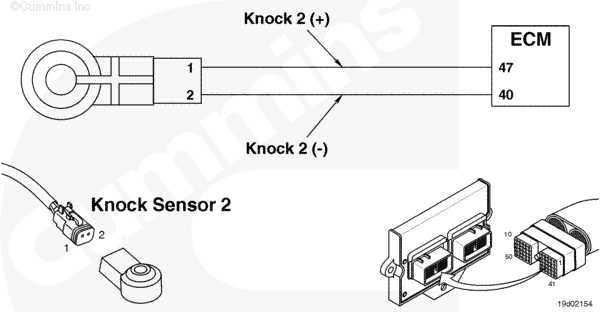
Knock Sensor Circuit |
 |
;)
;)
Circuit Description
The knock sensor is an accelerometer which measures high frequency vibrations. The electronic control module (ECM) processes the voltage signals from the knock sensor to check for an elevated signal during the combustion cycle for each cylinder. In this way, one sensor can be used for multiple cylinders.
Component Location
Knock sensor 1 is located on the side of the engine, on the block, above the air compressor on C and L engines. The B series engine has the knock sensor located on the cylinder head intake cover capscrew. The front knock sensor mounting surface on the C and L engine block has two identically sized holes. The knock sensor is mounted on the lower hole and the top hole is used on some products for p-clip mounting.
Shop Talk
The knock sensors are located on the cylinder block and cylinder head. There are two sensors. Knock sensor 1 monitors cylinders 1, 2, and 3; and knock sensor 2 monitors cylinders 4, 5, and 6. The vehicle keyswitch
must be cycled before full power will be restored after a knock induced derate.
The knock sensors measure the high frequency vibration of the engine due to combustion knock. Knock may occur if the engine is supplied low quality fuel or operated at excessive temperatures. Other sources of high frequency vibration may also cause knock faults to be logged. This may include gear driven accessories such as air compressors or hydraulic pumps, driveline vibration, or a rough running engine due to low fuel pressure.
When the conditions exist, knock faults typically will occur when operated at full power such as during wide open throttle acceleration or during a stall test on an automatic transmission. As such, faults will likely be inactive at idle.
Troubleshooting Steps
| STEPS | SPECIFICATIONS | |
|---|---|---|
| STEP 1. | Check for fault codes. | |
| STEP 1A. Check for an active fault code. | Fault Code 572 active? | |
| STEP 1B. Check for existing fault codes other than knock fault codes. | Active fault codes other than knock fault codes? | |
| STEP 1C. Check for an active fault code. | Fault Code 566 active? | |
| STEP 2. | Check the knock sensor and related components. | |
| STEP 2A. Inspect the knock sensor and sensor connector. | Any knock sensor damage? | |
| STEP 2B. Check for an ignition related problem. | Ignition system operating properly? | |
| STEP 2C. Check the turbocharger wastegate. | Is the turbocharger wastegate functioning properly? | |
| STEP 2D. Check the overhead adjustment. | Overhead adjustment within specification? | |
| STEP 2E. Check the air compressor timing. | Air compressor timed correctly? | |
| STEP 2F. Check for cylinder damage. | Evidence of damage? | |
| STEP 3. | Check ECM calibration and clear fault codes. | |
| STEP 3A. Check to see if an ECM calibration update is available. | If a calibration update for this fault code is available, does the ECM contain that revision or higher? | |
| STEP 3B. Disable the fault code. | Fault Code 566 inactive? | |
Guided Step 1 – Check for fault codes.
| Guided Step 1A – Check for an active fault code. | |
|---|---|
Conditions
ActionStart the engine and operate the engine in the condition in which the knock fault occurred.
|
|
|
Fault Code 572 active? |
|
| YES | NO |
| No Repair | No Repair |
|
Reference Fault Code 572
|
|
| Guided Step 1B – Check for existing fault codes other than knock fault codes. | |
|---|---|
Conditions
ActionStart the engine and operate the engine in the condition in which the knock fault occurred.
|
|
|
Active fault codes other than knock fault codes? |
|
| YES | NO |
| No Repair | No Repair |
|
Troubleshoot applicable fault code(s)
|
|
| Guided Step 1C – Check for an active fault code. | |
|---|---|
Conditions
ActionStart the engine and operate the engine in the condition in which the knock fault occurred.
|
|
|
Fault Code 566 active? |
|
| YES | NO |
| No Repair | No Repair |
Guided Step 2 – Check the knock sensor and related components.
| Guided Step 2A – Inspect the knock sensor and sensor connector. | |
|---|---|
Conditions
ActionInspect the knock sensor for the following:
Note: Washers or p-clips can Use the following procedure for general inspections techniques. |
|
|
Any knock sensor damage? |
|
| YES | NO |
|
An incorrectly mounted or damaged knock sensor has been detected.
|
No Repair |
| Guided Step 2B – Check for an ignition related problem. | |
|---|---|
Conditions
ActionCheck for an ignition-related problem:
|
|
|
Ignition system operating properly? |
|
| YES | NO |
| No Repair |
An ignition related problem has been detected. Repair or replace the damaged components. Use the following procedure in the C8.3G, C Gas Plus, and L Gas Plus Engines Troubleshooting and Repair Manual, Bulletin 3666206. Use the following procedure in the C8.3G, C Gas Plus, and L Gas Plus Engines Troubleshooting and Repair Manual, Bulletin 3666206. Use the following procedure in the B5.9G, B5.9LPG, B Gas Plus, B LPG Plus, B Gas International, and G5.9 Engines Troubleshooting and Repair Manual, Bulletin 3666164. Use the following procedure in the B5.9G, B5.9LPG, B Gas Plus, B LPG Plus, B Gas International, and G5.9 Engines Troubleshooting and Repair Manual, Bulletin 3666164. |
| Guided Step 2C – Check the turbocharger wastegate. | |
|---|---|
Conditions
ActionCheck the turbocharger wastegate for proper operation.
|
|
|
Is the turbocharger actuator functioning properly? |
|
| YES | NO |
| No Repair |
A damaged turbocharger actuator has been detected. Replace the actuator.
|
| Guided Step 2D – Check the overhead adjustment. | |
|---|---|
Conditions
ActionCheck the overhead adjustment:
|
|
|
Overhead adjustment within specification? |
|
| YES | NO |
| No Repair |
Adjust the overhead.
|
| Guided Step 2E – Check the air compressor timing. | |
|---|---|
Conditions
ActionCheck the air compressor timing:
|
|
|
Air compressor timed correctly? |
|
| YES | NO |
| No Repair |
An incorrectly timed air compressor has been detected. Set the air compressor timing.
|
| Guided Step 2F – Check for cylinder damage. | |
|---|---|
Conditions
ActionInspect for cylinder damage.
|
|
|
Evidence of damage? |
|
| YES | NO |
|
Replace the damaged components.
|
No Repair |
Guided Step 3 – Check ECM calibration and clear fault codes.
| Guided Step 3A – Check to see if an ECM calibration update is available. | |
|---|---|
Conditions
ActionCompare the ECM code and revision in the ECM to the calibration revisions listed in the ECM Calibration Revision History for applicable changes related to this fault code.
|
|
|
If a calibration update for this fault code is available, does the ECM contain that revision or higher? |
|
| YES | NO |
| No Repair |
If necessary, calibrate the ECM. Refer to Procedure |
| Guided Step 3B – Disable the fault code. | |
|---|---|
Conditions
ActionDisable and clear the fault code.
|
|
|
Fault Code 566 inactive? |
|
| YES | NO |
| No Repair |
Return to the troubleshooting steps or contact a Cummins® Authorized Repair Location if all steps have been completed and checked again. |
|
Repair complete
|
|