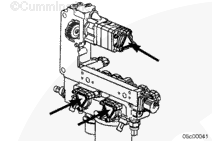
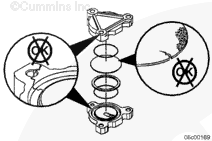
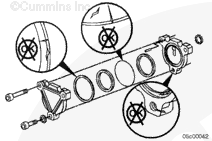
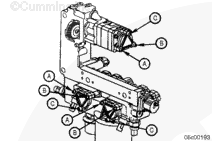
Remove the final capscrew and remove the housing from the cover. Remove the steel diaphragm. Discard the o-rings. Inspect the nylon washer and discard if damaged.
Check for corrosion, wear, or cracks in the cover or the diaphragm. Replace all damaged parts.
To check the diaphragm for hidden cracks, drop it on a flat, hard surface. It must have a clear ring. If it produces a flat sound, replace the diaphragm.
Automotive, Industrial with CM570 and Power Generation without CM570
Remove the housing from the cover. Remove the steel diaphragm. Discard the o-rings. Inspect the nylon washer and discard it if it is damaged.
Check for corrosion, wear, or cracks in the cover or the diaphragm. Replace the damaged parts.
To check the diaphragm for hidden cracks, drop it on a flat, hard surface. It must have a clear ring. If it produces a flat sound, replace the diaphragm.
Assemble the fuel pulsation damper with new o-rings, a new steel diaphragm, and a new nylon washer, if needed. Install the lower fuel pulsation damper capscrew.
Lower
9.5 n.m
[84 in-lb]
Verify the seal (1) is in the groove of the fuel pulsation damper (2) and add Lubriplate™ to hold the seal in place.
Attach the fuel pulsation damper (2) with capscrews (3).
Automotive, Industrial with CM570 and Power Generation without CM570
Assemble the fuel pulsation damper with new o-rings, a new steel diaphragm, and a new nylon washer, if needed. Install the lower fuel pulsation damper capscrew.
Hello, I'm Jack, a diesel engine fan and a blogger. I write about how to fix and improve diesel engines, from cars to trucks to generators. I also review the newest models and innovations in the diesel market. If you are interested in learning more about diesel engines, check out my blog and leave your feedback.
View all posts by Jack