Do not remove the pressure cap from a hot engine. Wait until the coolant temperature is below 50°C [120°F] before removing the pressure cap. Heated coolant spray or steam can cause personal injury.
WARNING
Coolant is toxic. Keep away from children and pets. If not reused, dispose of in accordance with local environment regulations.
Drain the coolant.
For Signature™, ISX, and QSX15 engines, use the following procedure in the Signature™, ISX, and QSX15 Service Manual, Bulletin 3666239. Refer to Procedure 008-018 in Section 8.
For ISM, ISMe, and QSM11 engines, use the following procedure in the ISM, ISMe, and QSM11 Service Manual, Bulletin 3666322. Refer to Procedure 008-018 in Section 8.
Do not remove the pressure cap from a hot engine. Wait until the coolant temperature is below 50°C [120°F] before removing the pressure cap. Heated coolant spray or steam can cause personal injury.
WARNING
Coolant is toxic. Keep away from children and pets. If not reused, dispose of in accordance with local environment regulations.
NOTE: Determine the appropriate radiator or coolant expansion tank cap adapter for the vehicle being serviced. A list of available caps and applications can be found in Section 14 of the Service Products Catalog, Bulletin 3377710.
Use a vacuum pump type device on the cooling system. Install the adapter on the radiator or coolant expansion tank. Connect an automotive hand held vacuum pump and apply 3 in Hg [40 in H2O] of vacuum.
NOTE: Depending on the cooling system configuration, more vacuum may be required to keep the cooling system in balance.
Place a container under the aftertreatment fuel injector. There may be a small quantity of coolant that drains from the coolant lines when disconnected.
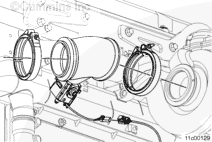
Remove the V-band clamp between the exhaust adapter pipe and the turbocharger.
Remove the V-band clamp between the exhaust adapter pipe and the OEM exhaust down-pipe.
Remove the adapter pipe assembly from engine.
Remove the gasket from each end and discard. Do not use a screwdriver or other sharp tool to remove the gaskets. This will damage the gasket seating area.
When using solvents, acids, or alkaline materials for cleaning, follow the manufacturer’s recommendations for use. Wear goggles and protective clothing to reduce the possibility of personal injury.
WARNING
Wear appropriate eye and face protection when using compressed air. Flying debris and dirt can cause personal injury.
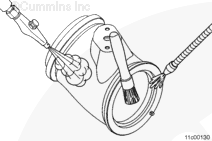
Saturate the inside of the adapter pipe with safety solvent.
Mineral based solvents can be used if results from safety solvent are not acceptable.
Clean the inside of the adapter pipe with a non-abrasive brush.
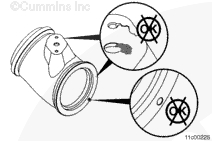
Saturate the injector mounting pad with safety solvent.
Clean the mounting surface with a non-abrasive brush.
For Signature™, ISX, and QSX15 engines, use the following procedure in the Signature™, ISX, and QSX15 Service Manual, Bulletin 3666239. Refer to Procedure 008-018 in Section 8.
For ISM, ISMe, and QSM11 engines, use the following procedure in the ISM, ISMe, and QSM11 Service Manual, Bulletin 3666322. Refer to Procedure 008-018 in Section 8.
Hello, I'm Jack, a diesel engine fan and a blogger. I write about how to fix and improve diesel engines, from cars to trucks to generators. I also review the newest models and innovations in the diesel market. If you are interested in learning more about diesel engines, check out my blog and leave your feedback.
View all posts by Jack
 WARNING


;)
;)
;)
;)
;)
;)
;)
;)
;)
;)