ISM, ISMe, and QSM11 – 001-023   Crankshaft Seal, Front

Preparatory Steps

TOC

 WARNING 

Batteries can emit explosive gases. To reduce the possibility of personal injury, always ventilate the compartment before servicing the batteries. To reduce the possibility of arcing, remove the negative (-) battery cable first and attach the negative (-) battery cable last.

SMALL | MEDIUM | LARGE

Remove

TOC

Lip Seal


Remove the 6 capscrews, the clamping ring (1), the front crankshaft oil seal (3), and dust seal (2) together.

Remove the gasket (4).

SMALL | MEDIUM | LARGE
   

Unitized Seal


The unitized seal requires the use of the Crankshaft Seal Replacer Kit, Part Number 4918798 or equivalent, for the removal process.

After removing the six mounting capscews, position the replacer over the crankshaft nose and seal flange.

SMALL | MEDIUM | LARGE


NOTE: It can be necessary to use additional sheet metal screws if the seal is difficult to remove.

Drive three sheet metal screws into the front crankshaft oil seal through the small holes in the replacer.

SMALL | MEDIUM | LARGE


Assemble the ST-647 puller to the replacer with two 3/8-16 capscrews.

Turn the puller screw clockwise until the front crankshaft oil seal is removed.

NOTE: If a wear sleeve is already installed, it must be removed prior to installing a unitized crankshaft seal.

SMALL | MEDIUM | LARGE
   

Clean and Inspect for Reuse

TOC

Clean the front crankshaft oil seal gasket surface of the gear cover.

Inspect the crankshaft for nicks, burrs, and grooves.

Remove metal shavings with a magnet.

Clean the bore area with crocus cloth.

SMALL | MEDIUM | LARGE
   

Install

TOC

Unitized Seal


The capscrew hole spacing on the front crankshaft oil seal is not symmetrical.

Start three, 60 mm [2 in] setscrews into holes as shown in the illustration. Make certain that the hexagonal socket is located to the outside.

 
SMALL | MEDIUM | LARGE


The gear cover, front crankshaft oil seal, and carrier gasket are each marked with an arrow, located at approximately the three-o’clock location.

Orient by stacking the arrows. The arrows point clockwise.

 
SMALL | MEDIUM | LARGE


 CAUTION 

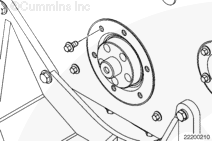
The wear sleeve must not be disassembled from the seal prior to (or during) seal installation. If the wear sleeve and seal become separated during installation, the assembly must be discarded.

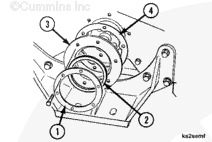
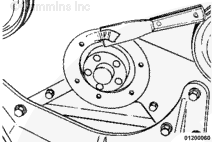
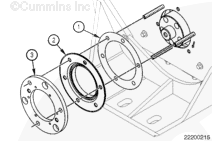
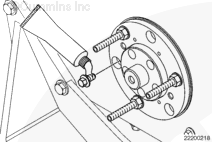
The unitized front crankshaft seal includes a wear sleeve that must be pressed into the crankshaft. Use crankshaft seal replacer kit, Part Number 4918798, or equivalent.

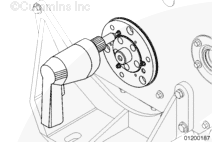
NOTE: Do not use any kind of lubricant to install the seal.

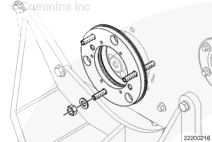
Position both the seal and replacer over the setscrews together, to avoid accidentally separating the seal from the wear sleeve.

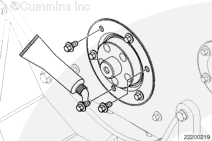
Confirm orientation. Make certain that the tool, seal, gasket, and gear cover holes align.

SMALL | MEDIUM | LARGE


 CAUTION 

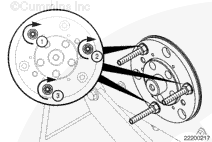
When tightening the hexagon nuts to install the oil seal onto the crankshaft, make certain that the seal remains parallel to the front cover. Failure to do so can result in damage to the oil seal.

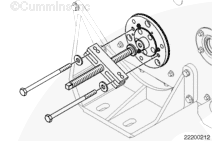
Assemble three washers and three M8 hexagonal nuts onto the setscrews.

SMALL | MEDIUM | LARGE


Tighten the hexagon nuts one revolution at a time. Alternately tighten in a clockwise pattern until the seal and tool seat against the front cover.

Tighten the three hexagonal nuts.

Torque Value:  7  n.m  [62 in-lb]

SMALL | MEDIUM | LARGE


Apply sealant to the capscrews, install and tighten the three capscrews through the replacer plate into open mounting hole locations.

Torque Value:  7  n.m  [62 in-lb]

SMALL | MEDIUM | LARGE


Remove the replacer tool and setscrews before installing the three remaining capscrews.

Torque Value:  7  n.m  [62 in-lb]

Follow a star pattern to tighten the six capscrews to final torque.

Torque Value:  20  n.m  [177 in-lb]

Check the difference in the final installed height of the seal flange versus the wear sleeve.

The difference must not exceed 1 mm [0.04 in].

SMALL | MEDIUM | LARGE
   

Finishing Steps

TOC

SMALL | MEDIUM | LARGE
Last Modified:  05-Mar-2009