|
Engine Speed High – Critical
|

Overview
| CODE | REASON | EFFECT |
| Fault Code: 234 PID: 190 SPN: 190 FMI: 0 LAMP: Red SRT: |
Engine Speed High – Data Valid but Above Normal Operational Range – Most Severe Level. Engine speed signal indicates engine speed above engine protection limit, |
Spark and fuel disabled until engine speed falls below the overspeed limit. |
|
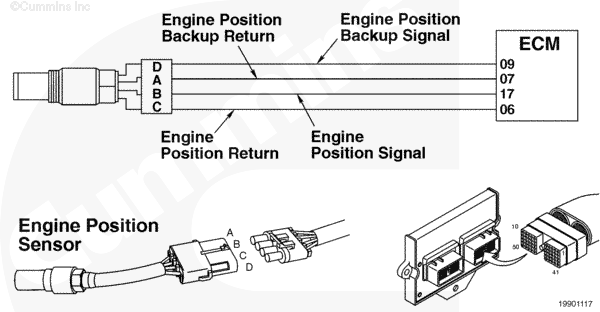
Engine Position Sensor Circuit |
 |
Circuit Description
The engine position sensor monitors the engine speed and position, then passes this information to the electronic control module (ECM) through the sensor harness.
Component Location
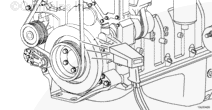
The engine position sensor is located in the gear housing, above the air compressor.
Shop Talk
The engine position sensor is a magnetic sensor and senses the raised material on the back of the camshaft gear to determine engine position and speed. Make sure the correct operation conditions are followed when operating the engine as described in the operation and maintenance manual. To check for valid overspeed, check the fault code snapshot information for the speed reached. This fault will activate at 2800 rpm on the C Gas Plus and 3200 rpm on the B Gas Plus engines.
Cautions and Warnings
 CAUTION CAUTION If the engine speed stays above 3500 rpm, the engine must be shut off immediately or engine damage will occur. |
|
CAUTION To reduce the possibility of damaging a new ECM, all other active fault codes must be investigated prior to replacing the ECM. |
|
CAUTION To reduce the possibility of pin and harness damage, use the following test lead when taking a |
Troubleshooting Steps
| STEPS | SPECIFICATIONS | |
|---|---|---|
| STEP 1. | Identify the reason for the overspeed. | |
| STEP 1A. Check for proper operating conditions. | Motoring downhill? | |
| STEP 1B. Check for an alternate fuel source | Alternate fuel source? | |
| STEP 1C. Check the engine rpm with INSITE™ electronic service tool. | Correct rpm reading? | |
| STEP 1D. Inspect the engine harness and engine sensor connector pins. | Dirty or damaged pins? | |
| STEP 1E. Check for an active fault code at low engine rpm. | Inactive fault code at low rpm? | |
| STEP 1F. Test the vehicle. | Fault Code 234 inactive? | |
| STEP 2. | Clear the fault codes. | |
| STEP 2A. Disable the fault code. | Fault Code 234 inactive? | |
| STEP 2B. Clear the inactive fault codes. | All fault codes cleared? | |
Guided Step 1 – Identify the reason for the overspeed
| Guided Step 1A – Check for proper operating conditions. | |
|---|---|
Conditions
Action
|
|
|
Motoring downhill? |
|
| YES | NO |
|
Check for engine damage.
|
No Repair |
| Guided Step 1B – Check for an alternate fuel source. | ||
|---|---|---|
Conditions
Action
|
|
|
|
Alternate fuel source? |
||
| YES | NO | |
|
Locate any alternate fuel sources, such as operating the engine near flammable vapors, etc. |
No Repair | |
| Guided Step 1C – Check the engine rpm with INSITE™ electronic service tool. | ||
|---|---|---|
Conditions
Action
|
|
|
|
Correct rpm reading? |
||
| YES | NO | |
| No Repair |
Inspect the crankshaft engine speed sensor and camshaft engine position sensor as outlined in Fault code 115 and Fault Code 121. |
|
|
Fault Codes 689 and 778
|
||
| Guided Step 1D – Inspect the engine harness and engine speed sensor connector pins. | |
|---|---|
Conditions
Action
For general inspection techniques, refer to Component Connector and Pin Inspection, Procedure 019-361. |
|
|
Dirty or damaged pins? |
|
| YES | NO |
|
A defective connection has been detected in the sensor or harness connector. Repair the damaged connector pins. Repair or replace the engine harness, whichever has the damaged pins. |
No Repair |
| Guided Step 1E – Check for an inactive fault code at low engine rpm. | |
|---|---|
Conditions
Action
|
|
|
Inactive fault code at low rpm? |
|
| YES | NO |
| No Repair |
Replace the ECM. Call for pre-authorization. Refer to Procedure 019-031. |
| Guided Step 1F – Test the vehicle. | ||
|---|---|---|
Conditions
Action
|
|
|
|
Fault Code 234 inactive? |
||
| YES | NO | |
| No Repair |
Troubleshooting procedures need to be repeated from the beginning. |
|
;)
;)
;)
;)
;)
;)
;)
;)
Guided Step 2 – Clear the fault codes.
| Guided Step 2A – Disable the fault code. | |
|---|---|
Conditions
Action
|
|
|
Fault Code 234 inactive? |
|
| YES | NO |
| No Repair | No Repair |
| Guided Step 2B – Clear the inactive fault codes. | |
|---|---|
Conditions
Action
|
|
|
All fault codes cleared? |
|
| YES | NO |
| No Repair | No Repair |
|
Repair complete
|
Appropriate troubleshooting charts
|