|
Fuel Pressure Sensor – Over Pressure Warning
|

Overview
| CODE | REASON | EFFECT |
| Fault Code: 449 PID: P94 SPN: 94 FMI: 0/16 LAMP: Amber SRT: |
Fuel Pressure Sensor – Over Pressure Warning. Fuel pressure signal indicates that fuel pressure has exceeded the maximum limit for the given engine condition. |
Possible erratic engine performance. |
|
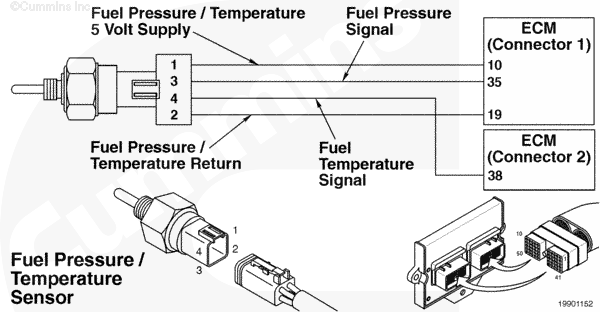
Fuel Pressure/Temperature Sensor Circuit |
 |
Circuit Description
The electronic control module (ECM) uses the fuel pressure/temperature sensor (combination sensor) to measure the fuel temperature, as well as secondary pressure.
Component Location
The fuel pressure/temperature sensor is located in the fuel housing.
Shop Talk
The fuel pressure/temperature sensor measures the secondary fuel pressure to the engine. This is after the low-pressure regulator. The fuel pressure/temperature sensor, secondary, is an absolute sensor.
Troubleshooting Steps
| STEPS | SPECIFICATIONS | |
|---|---|---|
| STEP 1. | Check the fault codes. | |
| STEP 1A. Check for multiple fault codes. | Fault Codes 118, 119, 2118, 2119, and/or 2228 active? | |
| STEP 1B. Check the fuel pressure at the low-pressure regulator. | Is pressure less than maximum value for the engine family? | |
| STEP 1C. Check the fuel pressure at the high-pressure regulator. | Is pressure less than maximum value for the engine family? | |
| STEP 2. | Check the secondary fuel pressure sensor. | |
| STEP 2A. Inspect the secondary fuel pressure sensor and engine harness connector pins. | Dirty or damaged pins? | |
| STEP 2B. Verify the fuel pressure sensor reading. | Fuel pressure measurement within 5 percent? | |
| STEP 3. | Clear the fault codes. | |
| STEP 3A. Disable the fault codes. | Fault Coed 449 inactive? | |
| STEP 3B. Clear the inactive fault codes. | All fault codes cleared? | |
Guided Step 1 – Check the fault codes.
| Guided Step 1A – Check for multiple fault codes. | |
|---|---|
Conditions
ActionRead the fault codes.
|
|
|
Fault Codes 118, 119, 2118, 2119, and/or 2228 active? |
|
| YES | NO |
|
Troubleshoot the active fault codes. If all fault codes are active, start by troubleshooting Fault Code 2228. |
No Repair |
|
Appropriate troubleshooting tree
|
|
| Guided Step 1B – Check the fuel pressure at the low-pressure regulator. | |
|---|---|
Conditions
ActionCheck the fuel pressure after the low-pressure regulator.
Maximum pressures:
|
|
|
Is pressure less than maximum value for the engine family? |
|
| YES | NO |
| No Repair | No Repair |
| Guided Step 1C – Check the fuel pressure at the high-pressure regulator. | |
|---|---|
Conditions
ActionCheck the fuel pressure before the low pressure regulator.
Maximum pressures:
|
|
|
Is pressure less than maximum value for the engine family? |
|
| YES | NO |
|
Replace the low pressure regulator. Refer to Procedure |
Replace the high pressure regulator. Refer to the OEM troubleshooting and repair manual. |
Guided Step 2 – Check the secondary fuel pressure sensor.
| Guided Step 2A – Inspect the secondary fuel pressure sensor and engine harness connector pins. | |
|---|---|
Conditions
ActionInspect the sensor and engine harness connector pins for the following:
Refer to the circuit diagram or wiring diagram for component pin identification. For general inspection techniques, refer to Component Connector and Pin Inspection, Procedure |
|
|
Dirty or damaged pins? |
|
| YES | NO |
|
Repair the damaged pins. Repair or replace the engine harness, or replace the sensor, whichever has the damaged pins.
|
No Repair |
| Guided Step 2B – Verify the fuel pressure sensor reading. | |
|---|---|
Conditions
ActionVerify the fuel pressure reading.
|
|
|
Fuel pressure measurements within 5 percent? |
|
| YES | NO |
| No Repair |
Replace the sensor. Refer to Procedure |
Guided Step 3 – Clear the fault codes.
| Guided Step 3A – Disable the fault code. | |
|---|---|
Conditions
ActionDisable the fault code.
|
|
|
Fault Code 449 inactive? |
|
| YES | NO |
| No Repair | No Repair |
| Guided Step 3B – Clear the inactive fault codes. | |
|---|---|
Conditions
ActionClear the inactive fault codes.
|
|
|
All fault codes cleared? |
|
| YES | NO |
| No Repair |
Troubleshoot any remaining active fault codes. |
|
Repair complete
|
Appropriate troubleshooting charts
|

;)
;)