|
Accelerator Pedal Position Sensor Supply Voltage – Shorted Low
|

Overview
| CODE | REASON | EFFECT |
| Fault Code: 443 PID: S221 SPN: 1043 FMI: 4 LAMP: Amber SRT: |
Accelerator Pedal or Lever Position Sensor Supply Voltage Circuit – Voltage Below Normal, or Shorted to Low Source. Low voltage detected at the accelerator pedal position sensor. |
Engine idles when the idle validation switch indicates idle and ramps up to a default set speed when the idle validation switch indicates off idle. |
|
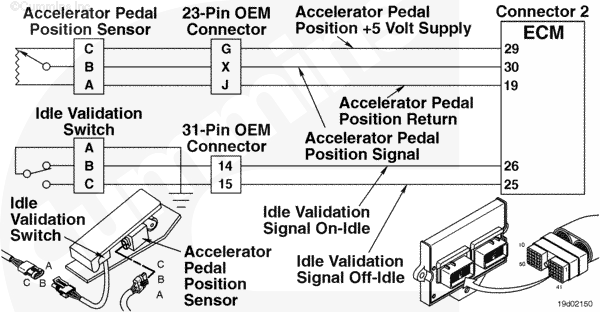
Accelerator Pedal or Lever Position Sensor Supply Voltage Circuit |
 |
Circuit Description
The accelerator pedal position sensor sends a signal to the electronic control module (ECM), when the driver depresses the accelerator pedal, to determine the accelerator pedal position.
Component Location
The accelerator pedal position sensor is located on the accelerator pedal.
Shop Talk
- Make sure there are no external circuits hooked into the accelerator pedal position sensor circuit and that there are no signs of tampering in the circuit.
- If all the wiring and sensor checks are okay, replace the accelerator pedal position sensor and the idle validation switch circuit wires, between the accelerator pedal and ECM, with new wires. Run the wires through or around the bulkhead without using the bulkhead connector. Test the vehicle with the test wires in place. If the fault code goes away, replace the OEM harness.
- Verify that the accelerator pedal position sensor wires are twisted together.
Cautions and Warnings
 CAUTION CAUTION To reduce the possibility of damaging a new ECM, all other active fault codes must be investigated prior to replacing the ECM. |
|
CAUTION To reduce the possibility of pin and harness damage, use the following test leads when taking a measurement: |
Troubleshooting Steps
| STEPS | SPECIFICATIONS | |
|---|---|---|
| STEP 1. | Check multiple fault codes. | |
| STEP 1A. Check for an inactive fault code. | Fault Code 443 inactive? | |
| STEP 2. | Check the sensors and sensor supply circuit. | |
| STEP 2A. Inspect the accelerator pedal position sensor and connector pins. | Dirty or damaged pins? | |
| STEP 2A-1. Check the circuit response. | ||
| STEP 3. | Check the ECM and engine harness. | |
| STEP 3A. Inspect the ECM and engine harness connector pins. | Dirty or damaged pins? | |
| STEP 3B. Check for a pin to pin short circuit in the engine and OEM harnesses. | Greater than 100k ohms? | |
| STEP 3B-1. Check for a pin short circuit to ground. | ||
| STEP 3C. Check for an inactive fault code. | Fault Code 443 inactive? | |
| STEP 4. | Clear the fault codes. | |
| STEP 4A. Disable the fault code. | Fault Code 443 inactive? | |
| STEP 4B. Clear the inactive fault codes. | All fault codes cleared? | |
Guided Step 1 – Check multiple fault codes.
| Guided Step 1A – Check for an inactive fault code. | |
|---|---|
Conditions
Action
|
|
|
Fault Code 443 inactive? |
|
| YES | NO |
| No Repair | No Repair |
Guided Step 2 – Check the sensors and sensor supply circuit.
| Guided Step 2A – Inspect the accelerator pedal position sensor and connector pins. | |
|---|---|
Conditions
Action
Refer to the circuit diagram or wiring diagram for connector pin identification. For general inspection techniques, refer to Component Connector and Pin Inspection, Procedure 019-361. |
|
|
Dirty or damaged pins? |
|
| YES | NO |
|
A defective connection has been detected in the sensor or harness connector. Repair the damaged pins. Repair or replace the engine harness, whichever has the damaged pins.
|
No Repair |
| Guided Step 2A-1 – Check the circuit response. | |
|---|---|
Conditions
Action
|
|
|
Fault Code 443 active? |
|
| YES | NO |
| No Repair |
A defective sensor has been detected. Replace the accelerator pedal position sensor. Refer to the OEM troubleshooting and repair manual. |
Guided Step 3 – Check the ECM and engine harness.
| Guided Step 3A – Inspect the ECM and engine harness connector pins. | |
|---|---|
Conditions
Action
Refer to the circuit diagram or wiring diagram for connector pin identification. For general inspection techniques, refer to Component Connector and Pin Inspection, Procedure 019-361. |
|
|
Dirty or damaged pins? |
|
| YES | NO |
|
A defective connection has been detected in the ECM connector or engine harness connector. Repair the damaged pins. Repair or replace the engine harness, whichever has the damaged pins. |
No Repair |
| Guided Step 3B – Check for a pin to pin short circuit in the engine and OEM harnesses. | |
|---|---|
Conditions
Action
Refer to the circuit diagram or wiring diagram for connector pin identification. For general resistance measurement techniques, refer to Resistance Measurements Using a Multimeter and Wiring Diagram, Procedure 019-360. |
|
|
Greater than 100k ohms? |
|
| YES | NO |
| No Repair |
A pin to pin short circuit on the accelerator pedal position sensor supply line has been detected in the engine or OEM harnesses. Troubleshoot each harness connected in series to determine which contains the shorted signal circuit. Repair or replace the engine harness. |
| Guided Step 3B-1 – Check for a pin short circuit to ground. | |
|---|---|
Conditions
Action
Refer to the circuit diagram or wiring diagram for connector pin identification. For general resistance measurement techniques, refer to Resistance Measurements Using a Multimeter and Wiring Diagram, Procedure 019-360. |
|
|
Greater than 100k ohms? |
|
| YES | NO |
| No Repair |
A pin to ground short circuit on the sensor supply number 1 line has been detected in the engine or OEM harnesses. Troubleshoot each harness connected in series to determine which contains the shorted signal circuit. Repair or replace the OEM or engine harnesses. |
| Guided Step 3C – Check for an inactive fault code. | |
|---|---|
Conditions
Action
|
|
|
Fault Code 443 inactive? |
|
| YES | NO |
| No Repair |
Replace the ECM. Call for pre-authorization. Refer to Procedure 019-031. |
Guided Step 4 – Clear the fault codes.
| Guided Step 4A – Disable the fault code. | |
|---|---|
Conditions
Action
|
|
|
Fault Code 443 inactive? |
|
| YES | NO |
| No Repair | No Repair |
| Guided Step 4B – Clear the inactive fault codes. | |
|---|---|
Conditions
Action
|
|
|
All fault codes cleared? |
|
| YES | NO |
| No Repair | No Repair |
|
Repair complete
|
Appropriate troubleshooting charts
|

;)
;)