Inspect the crankshaft, crankshaft gear, and the tone wheel alignment dowel for damage and replace components as necessary.
Inspect the machined surfaces for scratches or nicks.
Inspect the tone wheel alignment dowel hole for damage. If the dowel hole or the area surrounding the dowel hole has been damaged, the crankshaft must be replaced.
Use a crocus cloth to remove scratches or nicks. If scratches or nicks can be felt with a fingernail after the crankshaft has been polished with the crocus cloth, the crankshaft must be replaced.
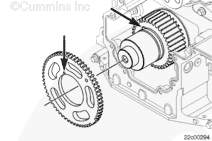
Inspect the crankshaft gear for excessive wear or damage.
If any teeth on the crankshaft gear are missing, chipped, or pitted, the crankshaft gear must be replaced.
The tone wheel must be installed so the face labeled “FRONT” faces away from the crankshaft gear.
The tone wheel is keyed to the crankshaft with a dowel. The tone wheel alignment dowel slot on the inside diameter of the tone wheel must align with the crankshaft pin for proper installation.
The tone wheel must be installed within 30 seconds after being removed from the oven.
Install the tone wheel so the slot on the inside diameter of the tone wheel aligns with the tone wheel alignment pin.
Hold the tone wheel in position for approximately 90 seconds to allow the shrink fit to properly hold the components.
Check the installation by attempting to insert a [0.25 mm] 0.010-inch feeler gauge between the crankshaft gear and the tone wheel at 4 locations approximately 90 degrees apart. If the feeler gauge can be inserted, the tone wheel must be removed and replaced.
Hello, I'm Jack, a diesel engine fan and a blogger. I write about how to fix and improve diesel engines, from cars to trucks to generators. I also review the newest models and innovations in the diesel market. If you are interested in learning more about diesel engines, check out my blog and leave your feedback.
View all posts by Jack


 WARNING


;)
;)
;)
;)
;)
;)
;)
;)
;)
;)
;)
;)