NOTE: If the gear cover contains an o-ring seal groove for the crankshaft seal and the seal needs to be replaced, the lower gear cover must also be replaced. The new crankshaft seal has the o-ring incorporated into the seal.
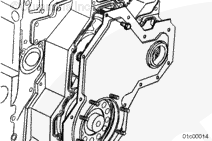
Remove the 15 capscrews and the lower gear cover. Discard the strip seal.
NOTE: All lower gear covers have either a beveled half groove or a full o-ring groove under the crankshaft seal flange.
Full o-ring groove covers contain an o-ring in the lower gear cover groove and were only used prior to June 5, 1999. The lower gear cover must be replaced if installing a new seal.
Beveled half groove covers do not contain an o-ring and only require replacement if damaged.
When using solvents, acids, or alkaline materials for cleaning, follow the manufacturer’s recommendations for use. Wear goggles and protective clothing to avoid personal injury.
WARNING
When using a steam cleaner, wear protective clothing and safety glasses, or a face shield. Hot steam can cause serious personal injury.
WARNING
Wear appropriate eye and face protection when using compressed air. Flying debris and dirt can cause personal injury.
Clean the sealing surface on the rear face of the lower gear cover and seal groove on the gear housing.
Use steam or solvent to clean the lower gear cover. Dry with compressed air.
NOTE: Do not tighten the capscrews until the new crankshaft seal is installed. The crankshaft seal must be installed first to locate the gear cover properly.
Position the lower gear cover with the 15 capscrews. Hand-tighten the capscrews.
This component or assembly weighs greater than 23 kg [50 lb]. To prevent serious personal injury, be sure to have assistance or use appropriate lifting equipment to lift this component or assembly.
Hello, I'm Jack, a diesel engine fan and a blogger. I write about how to fix and improve diesel engines, from cars to trucks to generators. I also review the newest models and innovations in the diesel market. If you are interested in learning more about diesel engines, check out my blog and leave your feedback.
View all posts by Jack


 WARNING


;)
;)
;)
;)
;)
;)
;)
;)
;)
;)
;)
;)
;)
;)
;)
;)
;)
;)