Do not remove the pressure cap from a hot engine. Wait until the coolant temperature is below 50°C [120°F] before removing the pressure cap. Heated coolant spray or steam can cause personal injury.
WARNING
Coolant is toxic. Keep away from children and pets. If not reused, dispose of in accordance with local environmental regulations.
WARNING
To reduce the possibility of personal injury, avoid direct contact of hot oil with your skin.
WARNING
Some state and federal agencies have determined that used engine oil can be carcinogenic and cause reproductive toxicity. Avoid inhalation of vapors, ingestion, and prolonged contact with used engine oil. If not reused, dispose of in accordance with local environmental regulations.
Automotive, Industrial with CM570 and Power Generation without CM570
WARNING
Do not remove the pressure cap from a hot engine. Wait until the coolant temperature is below 50°C [120°F] before removing the pressure cap. Heated coolant spray or steam can cause personal injury.
WARNING
Coolant is toxic. Keep away from children and pets. If not reused, dispose of in accordance with local environmental regulations.
WARNING
To reduce the possibility of personal injury, avoid direct contact of hot oil with your skin.
WARNING
Some state and federal agencies have determined that used engine oil can be carcinogenic and cause reproductive toxicity. Avoid inhalation of vapors, ingestion, and prolonged contact with used engine oil. If not reused, dispose of in accordance with local environmental regulations.
This component or assembly weighs greater than 23 kg [50 lb]. To prevent serious personal injury, be sure to have assistance or use appropriate lifting equipment to lift this component or assembly.
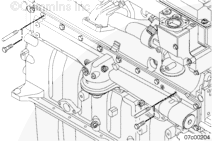
Remove the remaining 18 capscrews, oil cooler, and gasket. Discard the gasket.
Immediately upon removal of the lubricating oil cooler assembly, a plug must be inserted into the housing and cylinder block oil passage drillings. Failure to insert the oil passage plug can result in a bearing failure, crankshaft failure, or both.
The reusable plugs, Part Numbers 4918322, 4918324, and 4918340, are included in protective plug kit, Part Number 4918319. These plugs are necessary to prevent debris from entering the lubrication system during the repair.
Plug the oil cooler housing filtered oil passage with plug, Part Number 4918323, the block filtered oil passage with plug, Part Number 4918340, and the block oil pump passage with plug, Part Number 4918322.
Firmly push the plugs into the oil passages to prevent all debris from entering the lubrication system when cleaning the gasket surface.
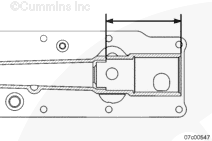
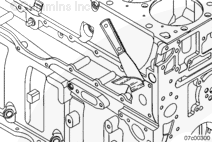
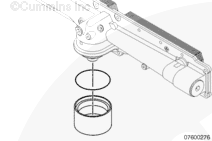
Measure from the spot face to the oil thermostat seat. Reference graphic for measurement points. If the measured diminsion for lubricating oil cooler housing with integrated filter head is less than the minimum dimension, the oil cooler housing will need to be replaced.
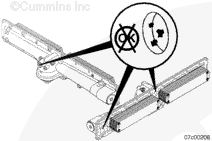
Do not reuse an oil cooler core after a debris related engine failure since there is no practical method for cleaning the cooler core. Metal particles which can circulate through the lubricating system can remain in the cooler core and cause engine damage. Do not allow dirt to enter the oil passages when cleaning the oil cooler.
When using solvents, acids, or alkaline materials for cleaning, follow the manufacturer’s recommendations for use. Wear goggles and protective clothing to avoid personal injury.
WARNING
Wear appropriate eye and face protection when using compressed air. Flying debris and dirt can cause personal injury.
CAUTION
Do not allow dirt or foreign material to enter oil passages in the cooler housing when cleaning the gasket sealing surfaces. Connecting rod bearing failures can be caused if debris is introduced into the cylinder block or lubricating oil cooler housing oil passages.
Plug the oil cooler passages with rubber plugs, Part Numbers 4918322, 4918323, and 4918340, included in kit, Part Number 4918319, to prevent debris from entering the cooler when cleaning the gasket surface.
Clean gasket surfaces by hand with a gasket scraper or cleaning pad, Part Number 3823258. If the gasket material residue can not be felt with a finger, the surface is ready to accept the new gasket.
Use solvent to clean and flush the oil cooler passages and cores.
Blow dry with compressed air.
Remove the rubber plugs when cleaning is complete.
Do not allow dirt or foreign material to enter oil passages in the cylinder block when cleaning the gasket sealing surfaces. Connecting rod bearing failures can be caused if debris is introduced into the cylinder block or lubricating oil cooler housing oil passages. Therefore, use of power tools combined with abrasive pads to clean gasket surfaces is not recommended.
Plug the oil passages in the cylinder block with rubber plugs.
Clean the oil cooler to cylinder block gasket surface with Scotch-Brite™ 7448 abrasive pad.
Remove the rubber plugs when cleaning is complete.
It is important to leak test the oil cooler assembly as a unit, so leaks at the mounting joints can be identified. These leaks can not be found when testing individual elements that have been removed from the assembly. An element is replaced only if it is found to be leaking.
This procedure is most effective when the oil cooler assembly is tested in water below 7°C [44°F].
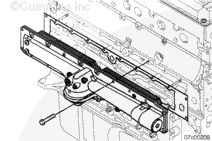
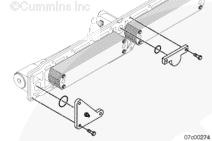
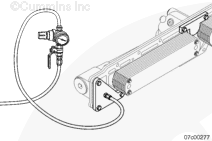
Use the mounting capscrews from the lubricating oil cooler to attach the two plates and corresponding o-rings from oil cooler leak test kit, Part Number 4918200, to the lubricating oil cooler housing.
This component or assembly weighs greater than 23 kg [50 lb]. To prevent serious personal injury, be sure to have assistance or use appropriate lifting equipment to lift this component or assembly.
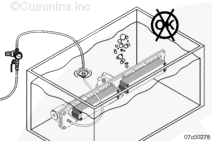
Place the oil cooler assembly under water.
If bubbles are observed, carefully determine the source of the bubbles and replace the components as necessary.
If no leaks are found and the engine serial number is in the range of 14023600 to 1405000 and 7900000 to 79012457, replace the capscrews and gaskets if the elements are to be reused.
If no leaks are found and the engine serial number is not in the above ranges, the element does not get removed, but the capscrew torque is to be checked and then tightened to the specified torque.
This component or assembly weighs greater than 23 kg [50 lb]. To prevent serious personal injury, be sure to have assistance or use appropriate lifting equipment to lift this component or assembly.
When installing a new two-element oil cooler on an older engine, be sure the cooler element mounting capscrews do not interfere with the cylinder block.
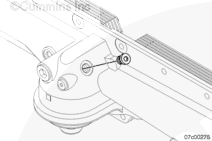
Install the guide pins.
Remove the protective plugs from the oil passages. Make sure no debris enters the lubrication system. Using a clean shop towel, carefully wipe out the oil passages and inspect to make sure no debris is left in these passages.
Install a new mounting gasket and the oil cooler housing assembly.
Hello, I'm Jack, a diesel engine fan and a blogger. I write about how to fix and improve diesel engines, from cars to trucks to generators. I also review the newest models and innovations in the diesel market. If you are interested in learning more about diesel engines, check out my blog and leave your feedback.
View all posts by Jack
 WARNING


 CAUTION
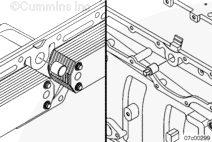


;)
;)
;)
;)
;)
;)
;)
;)
;)
;)
;)
;)
;)
;)
;)
;)
;)
;)
;)
;)
;)
;)
;)
;)
;)
;)
;)
;)